Migrating a Non-Production Instance Off Production Infrastructure
A step-by-step guide for Nautobot Cloud administrators
| Applies to | Nautobot Cloud instances flagged as production but used for non-production work. |
| Audience | Organization administrators in your Nautobot Cloud account. |
| Why it matters | Non-production instances share a database cluster with production and compete for its capacity. Moving them removes that contention. |
| Impact | Only the instance being migrated is affected. Production instances stay online throughout. |
| Outcome | A non-production instance that keeps your data and secrets, with the option to retain the original URL. |
Why migrate non-production instances
All instances flagged as production share the same database cluster. The data itself stays separate from one instance to another, but sharing a database cluster means non-production workloads draw on the same common database cluster pool of connections, CPU, memory, and I/O throughput as production, and can negatively impact production usage of the database as a result.
Migrating those workloads onto separate infrastructure removes that risk. As each non-production instance is moved, the production database cluster is left serving production alone, with more capacity and more predictable performance over the long term.
Note: This migration only affects the non-production instance being moved. Production instances remain online and are not disrupted at any point in the process; the long-term effect on production is a positive one.
How the migration works
An instance's production designation is set when the instance is created and cannot be edited afterwards. To move an existing instance onto non-production infrastructure, you create a clone with the production setting turned off, point that clone at your existing secrets, and then retire the original instance.
The process has five stages:
- Clone the instance as non-production.
- Confirm the clone is healthy and its data looks correct.
- Update HashiCorp Vault secret paths to reference the new instance.
- Destroy the original instance.
- Optionally reassign the original URL to the replacement instance.
Important: Step 4 permanently deletes the original instance and cannot be undone. Do not begin that step until you have verified the clone in steps 2 and 3.
Before you begin
Have the following ready:
- Administrator access to your Nautobot Cloud account.
- A quiet period on the non-production instance being migrated. Users should be off that instance and no Nautobot Jobs should be running on it.
- A record of the original instance's name, URL, and short UUID.
- A list of the secrets on the instance that use the HashiCorp Vault provider, along with the credentials or access needed to verify them.
Tip: Take a snapshot of the original instance before you start, so you have a restore point.
Step 1: Clone the instance
Open the Instances list, locate the instance you want to migrate, select the actions menu (…) at the end of its row, and choose Clone.
In the Clone dialog:
- Instance to be Cloned — confirm the correct instance is selected.
- New Instance Name — enter a name for the replacement instance.
- New Instance Project — choose the project the new instance should belong to.
- URL — enter a temporary URL. The original instance still holds its URL at this point, so the two cannot match. You can reassign the original URL later in step 5.
- Is Production — leave this set to the default of No. This is the setting that places the new instance on non-production infrastructure.
Select Clone to start the build.
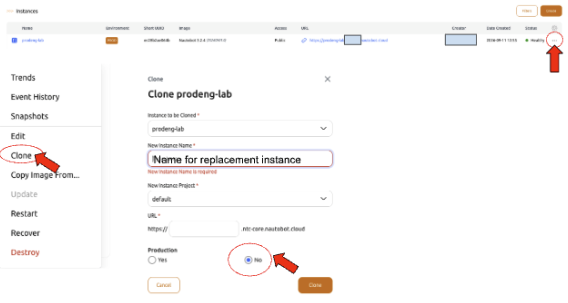
Figure 1: Cloning an instance, with Production left set to No.
Note: Production cannot be changed after an instance is created. If this value is set to Yes on the clone, the migration will not achieve its purpose and the clone will need to be rebuilt.
Step 2: Verify the new instance
Wait for the clone to finish building and for its status to show as Healthy. Then log in to the new instance and confirm that its contents match the original: devices, IP address data, jobs, apps, and any customizations you rely on.
Resolve any discrepancies before continuing. The original instance is still available at this point, so it remains your reference and fallback.
Step 3: Update HashiCorp Vault secret paths
Secret paths in Vault include the instance's short UUID. Because the clone has a new short UUID, each secret that uses the HashiCorp Vault provider must be updated on the new instance before it can retrieve values successfully.
3.1 Copy the new short UUID
In the Nautobot Cloud Instances list, find the replacement instance and copy the value in the Short UUID column.
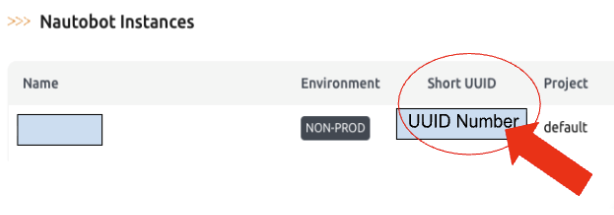
Figure 2: The Short UUID column in the Instances list.
3.2 Open the secrets on the new instance
Log in to the replacement instance and navigate to Secrets > Secrets.
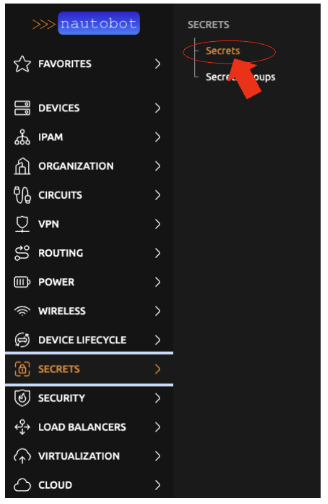
Figure 3: Navigating to Secrets in the Nautobot menu.
3.3 Identify the secrets that use HashiCorp Vault
Review the Provider column and note every secret listed as HashiCorp Vault. Secrets that use other providers, such as environment variables, do not need to be changed.
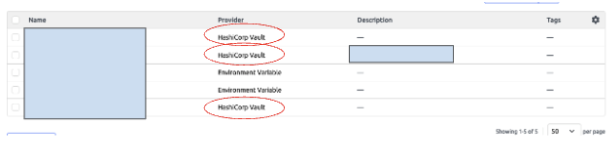
Figure 4: Secrets using the HashiCorp Vault provider.
3.4 Edit each Vault secret
Open each secret and select Edit Secret.
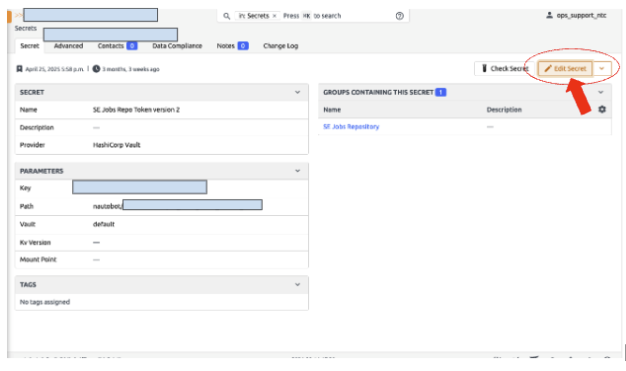
Figure 5: Opening a secret for editing.
3.5 Replace the short UUID in the path
In the Path field, replace the original instance's short UUID with the short UUID of the new instance. Leave the rest of the path unchanged, then save the secret.
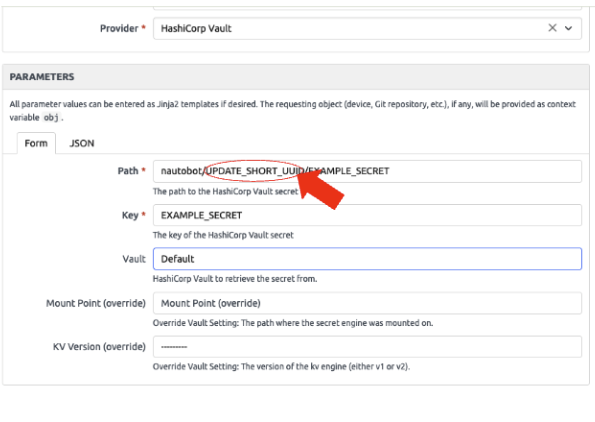
Figure 6: The Path field, where the short UUID segment is replaced.
Repeat this for every secret that uses the HashiCorp Vault provider. When you have finished, use Check Secret on each one to confirm the value is retrieved successfully.
Step 4: Destroy the original instance
Warning: This step permanently deletes the original instance and its data. Confirm that the replacement instance is healthy, validated, and retrieving its secrets before you continue.
If the original instance is set to Prevent Delete, edit the instance and set Prevent Delete to No, then save. Any user with administrator privileges can make this change, and it must be set to No before the instance can be destroyed.
Then open the actions menu (…) for the original instance and select Destroy.
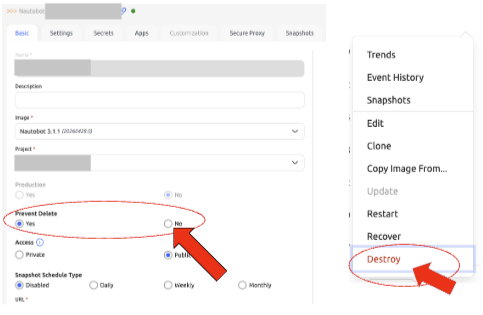
Figure 7: Setting Prevent Delete to No, then selecting Destroy.
Wait for the destroy operation to complete successfully before moving on.
Step 5: Reassign the original URL (optional)
Once the original instance has been destroyed, its URL becomes available again. If you want the replacement instance to keep the URL your users and integrations already use, edit the new instance, enter the original URL in the URL field, and select Save.
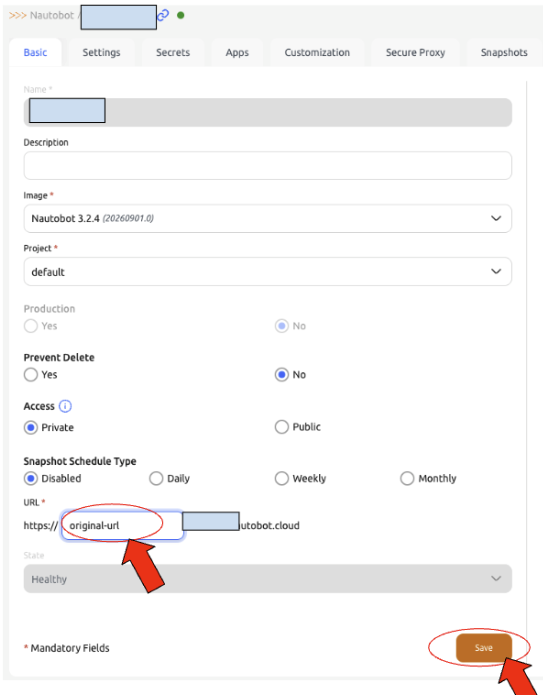
Figure 8: Updating the URL on the replacement instance.
After saving, an update pending dialog will appear. Select Update Now to apply the change; the new URL does not take effect until the update has been run.
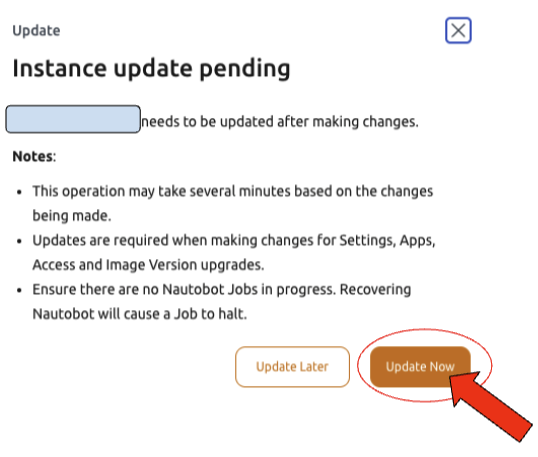
Figure 9: Selecting Update Now to apply the change.
Note: The update may take several minutes. Confirm that no Nautobot Jobs are in progress before you apply it, as the restart will halt any running job.
Confirm the migration is complete
When the migration is finished, verify the following:
- The replacement instance shows a status of Healthy.
- The instance is listed as non-production, confirming it is no longer running on the production database cluster.
- Every HashiCorp Vault secret returns a value when checked.
- The expected URL resolves to the replacement instance, and users can sign in.
- Jobs, apps, and integrations run as expected.
If anything does not behave as expected after the migration, contact your support team with the name and short UUID of the replacement instance.
Reach out to Nautobot Cloud support if you would like help planning a migration.