Upload Static Files
Static files let you add your own assets to a Nautobot instance — for example images, CSS, or templates you reference from custom content, or a logo for custom branding. Uploaded files are baked into your instance's image and placed in its custom static files directory, /opt/nautobot/extra-static/.
Static files are managed from the Customization tab of a Nautobot instance's detail view. Review the requirements and how customization works first.
Upload Files
- Open the instance and go to the Customization tab, then select Static Files (the default section).
- Click Upload Files.
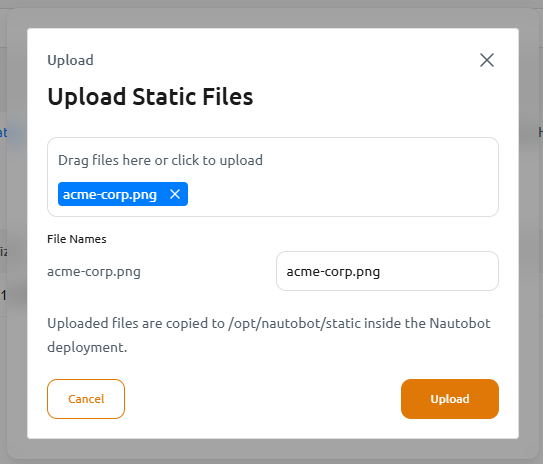
- Drag one or more files into the drop zone (or click to browse).
- For each file, set its File Name (it defaults to the uploaded file's name). Uploaded files are copied to
/opt/nautobot/extra-static/inside the instance. - Click Upload.
- Update the instance to build and deploy the new image. See Applying Your Changes.
Referencing an uploaded file
Uploaded files are served under a custom/ static namespace. The most reliable way to reference one from a template or custom content is Django's static tag — for example {% static "custom/diagram.png" %} for a file named diagram.png. That resolves to a URL of the form https://<your-instance>/static/<instance-id>/nautobot/custom/diagram.png, where <instance-id> is a prefix specific to your instance. Prefer the {% static %} tag over hardcoding that URL.
View and Manage Static Files
The Static Files list shows each uploaded file with its File Name, Size, URL Path, Date Uploaded, and upload Status (Uploaded, Pending, or Failed). For each file you can:
- Download the file.
- Delete the file.

Uploading or deleting a static file stages a pending change; Update the instance to apply it.
Static files are fixed for a given image
The set of static files is captured when the image is built. Adding, changing, or removing a file produces a new derived image on the next Update. This is handled for you — just make your changes and Update.
Custom Branding and Logo
You can replace the default Nautobot logo and icons with your organization's branding. This uses Nautobot's built-in branding settings and is a two-step process: upload the asset, then point Nautobot at it.
-
Upload the branding asset as a static file (see Upload Files). It's placed at
/opt/nautobot/extra-static/<file-name>and served under thecustom/static namespace. -
Set the matching branding environment variable(s) on the instance's Settings tab (see Instance Details). The value is the uploaded file's path under the
custom/namespace —custom/<file-name>, for examplecustom/acme-corp.png. The available variables are:Environment variable Branding asset NAUTOBOT_BRANDING_FILEPATHS_LOGOMain logo shown in the navigation bar NAUTOBOT_BRANDING_FILEPATHS_FAVICONBrowser favicon NAUTOBOT_BRANDING_FILEPATHS_ICON_1616×16 icon NAUTOBOT_BRANDING_FILEPATHS_ICON_3232×32 icon NAUTOBOT_BRANDING_FILEPATHS_ICON_180180×180 icon (Apple touch icon) NAUTOBOT_BRANDING_FILEPATHS_ICON_192192×192 icon NAUTOBOT_BRANDING_FILEPATHS_ICON_MASKSafari mask icon Enter only the
custom/…path — not the file's full path or URLThe value is just the file's path under the
custom/namespace, for examplecustom/acme-corp.png— Nautobot builds the rest of the URL for you. Don't paste the file's full served URL, its on-disk path, or the value shown in the Static Files list's URL Path column; those won't work here. The branding value is only thecustom/<file-name>part. -
Update the instance. Once it returns to Healthy, your branding appears in the UI.
To revert to the default Nautobot branding, remove the branding environment variables (and, optionally, the uploaded assets) and Update again.
Notes and Limits
- File type, individual file size, and total storage limits may apply. If an upload is rejected, reduce the file size or contact support.
- Do not upload files you don't control or trust — uploaded content becomes part of your instance's image.
- If a build fails after a static-file change, your instance keeps running its previous image and returns to Pending Update. Open the failed Build Image event in Event History and click See details to read the build log, correct the issue, and Update again. See Instance States.