Connect to Your Network Using Secure Proxy
Overview
Secure Proxy lets Nautobot Cloud worker jobs reach devices and services inside your private network — without site-to-site VPNs, inbound firewall rules, or any changes to your Nautobot jobs. You install a lightweight relay process on a single host inside your network. It opens an outbound connection to Nautobot Cloud, and all automation traffic is transparently tunneled through that connection.
-
Pros
Self-serve setup
No inbound firewall rules required
No VPN infrastructure to manage
Works with any network — no AWS account needed
Nautobot jobs require zero code changes
Lightweight footprint — a single process on one host
-
Cons
Requires a host inside your network running Python 3.10 or later
Requires outbound HTTPS/WSS access from that host to your Nautobot instance.
Traffic originates from the relay host — the relay host must be able to reach the devices your jobs target
How It Works
Each relay you deploy is paired with a dedicated Kubernetes job queue in your Nautobot instance. Jobs submitted to that queue run on worker pods with tunneled access to the relay's network, while jobs on the default celery: default queue continue to run on shared workers with no site access. From the job code's perspective, nothing changes — a job that opens a connection to 10.1.2.3 on port 22 does exactly that, and the platform handles the rest.
Here is what happens end-to-end:
- You install the relay on a host inside your network and point it at your Nautobot Cloud gateway URL.
- The relay connects outbound to Nautobot Cloud over a secure WebSocket (TLS). No inbound ports need to be opened.
- You pair the relay with a Kubernetes job queue of the same name in Nautobot (see Routing Jobs Through the Relay) and add that queue to the jobs that need to reach your network.
- When a worker job runs on that queue, traffic it generates is transparently sent through the tunnel to the relay.
- The relay opens a local connection to the target device from inside your network and bridges the traffic back.
The relay also forwards your network's DNS servers to Nautobot Cloud at startup, so worker jobs that resolve hostnames will use your internal nameservers automatically.
Supported traffic types:
| Type | Support |
|---|---|
| TCP connections | Supported |
| UDP (connected sockets) | Supported |
| DNS resolution | Resolved through your network's nameservers |
ping / traceroute diagnostics |
Executed on the relay host, output streamed back |
Setting Up the Relay
Prerequisites
- A host inside your network with:
- Python 3.10 or later
- Outbound TCP access to your Nautobot instance's Secure Proxy gateway URL (port 443 — provided during onboarding), e.g.,
spgw.instance.yourorg.nautobot.cloud:443 - Network access to the devices your Nautobot jobs will target
- Your relay token and gateway URL from the Nautobot Cloud Console (see Create a Relay and Obtain Credentials)
Create a Relay and Obtain Credentials
Credentials are generated when you create a Secure Proxy Relay record in the Cloud Console. Each relay process you plan to run requires its own record.
- Log in to the Nautobot Cloud Console.
- Open your Nautobot instance and select the Secure Proxy tab.
- Click Create and provide a Relay Name (for example,
NYDC1) and an optional description (for example,New York Datacenter 1). - Submit the form. The Cloud Console displays the Gateway Domain and Relay Token in a one-time dialog.
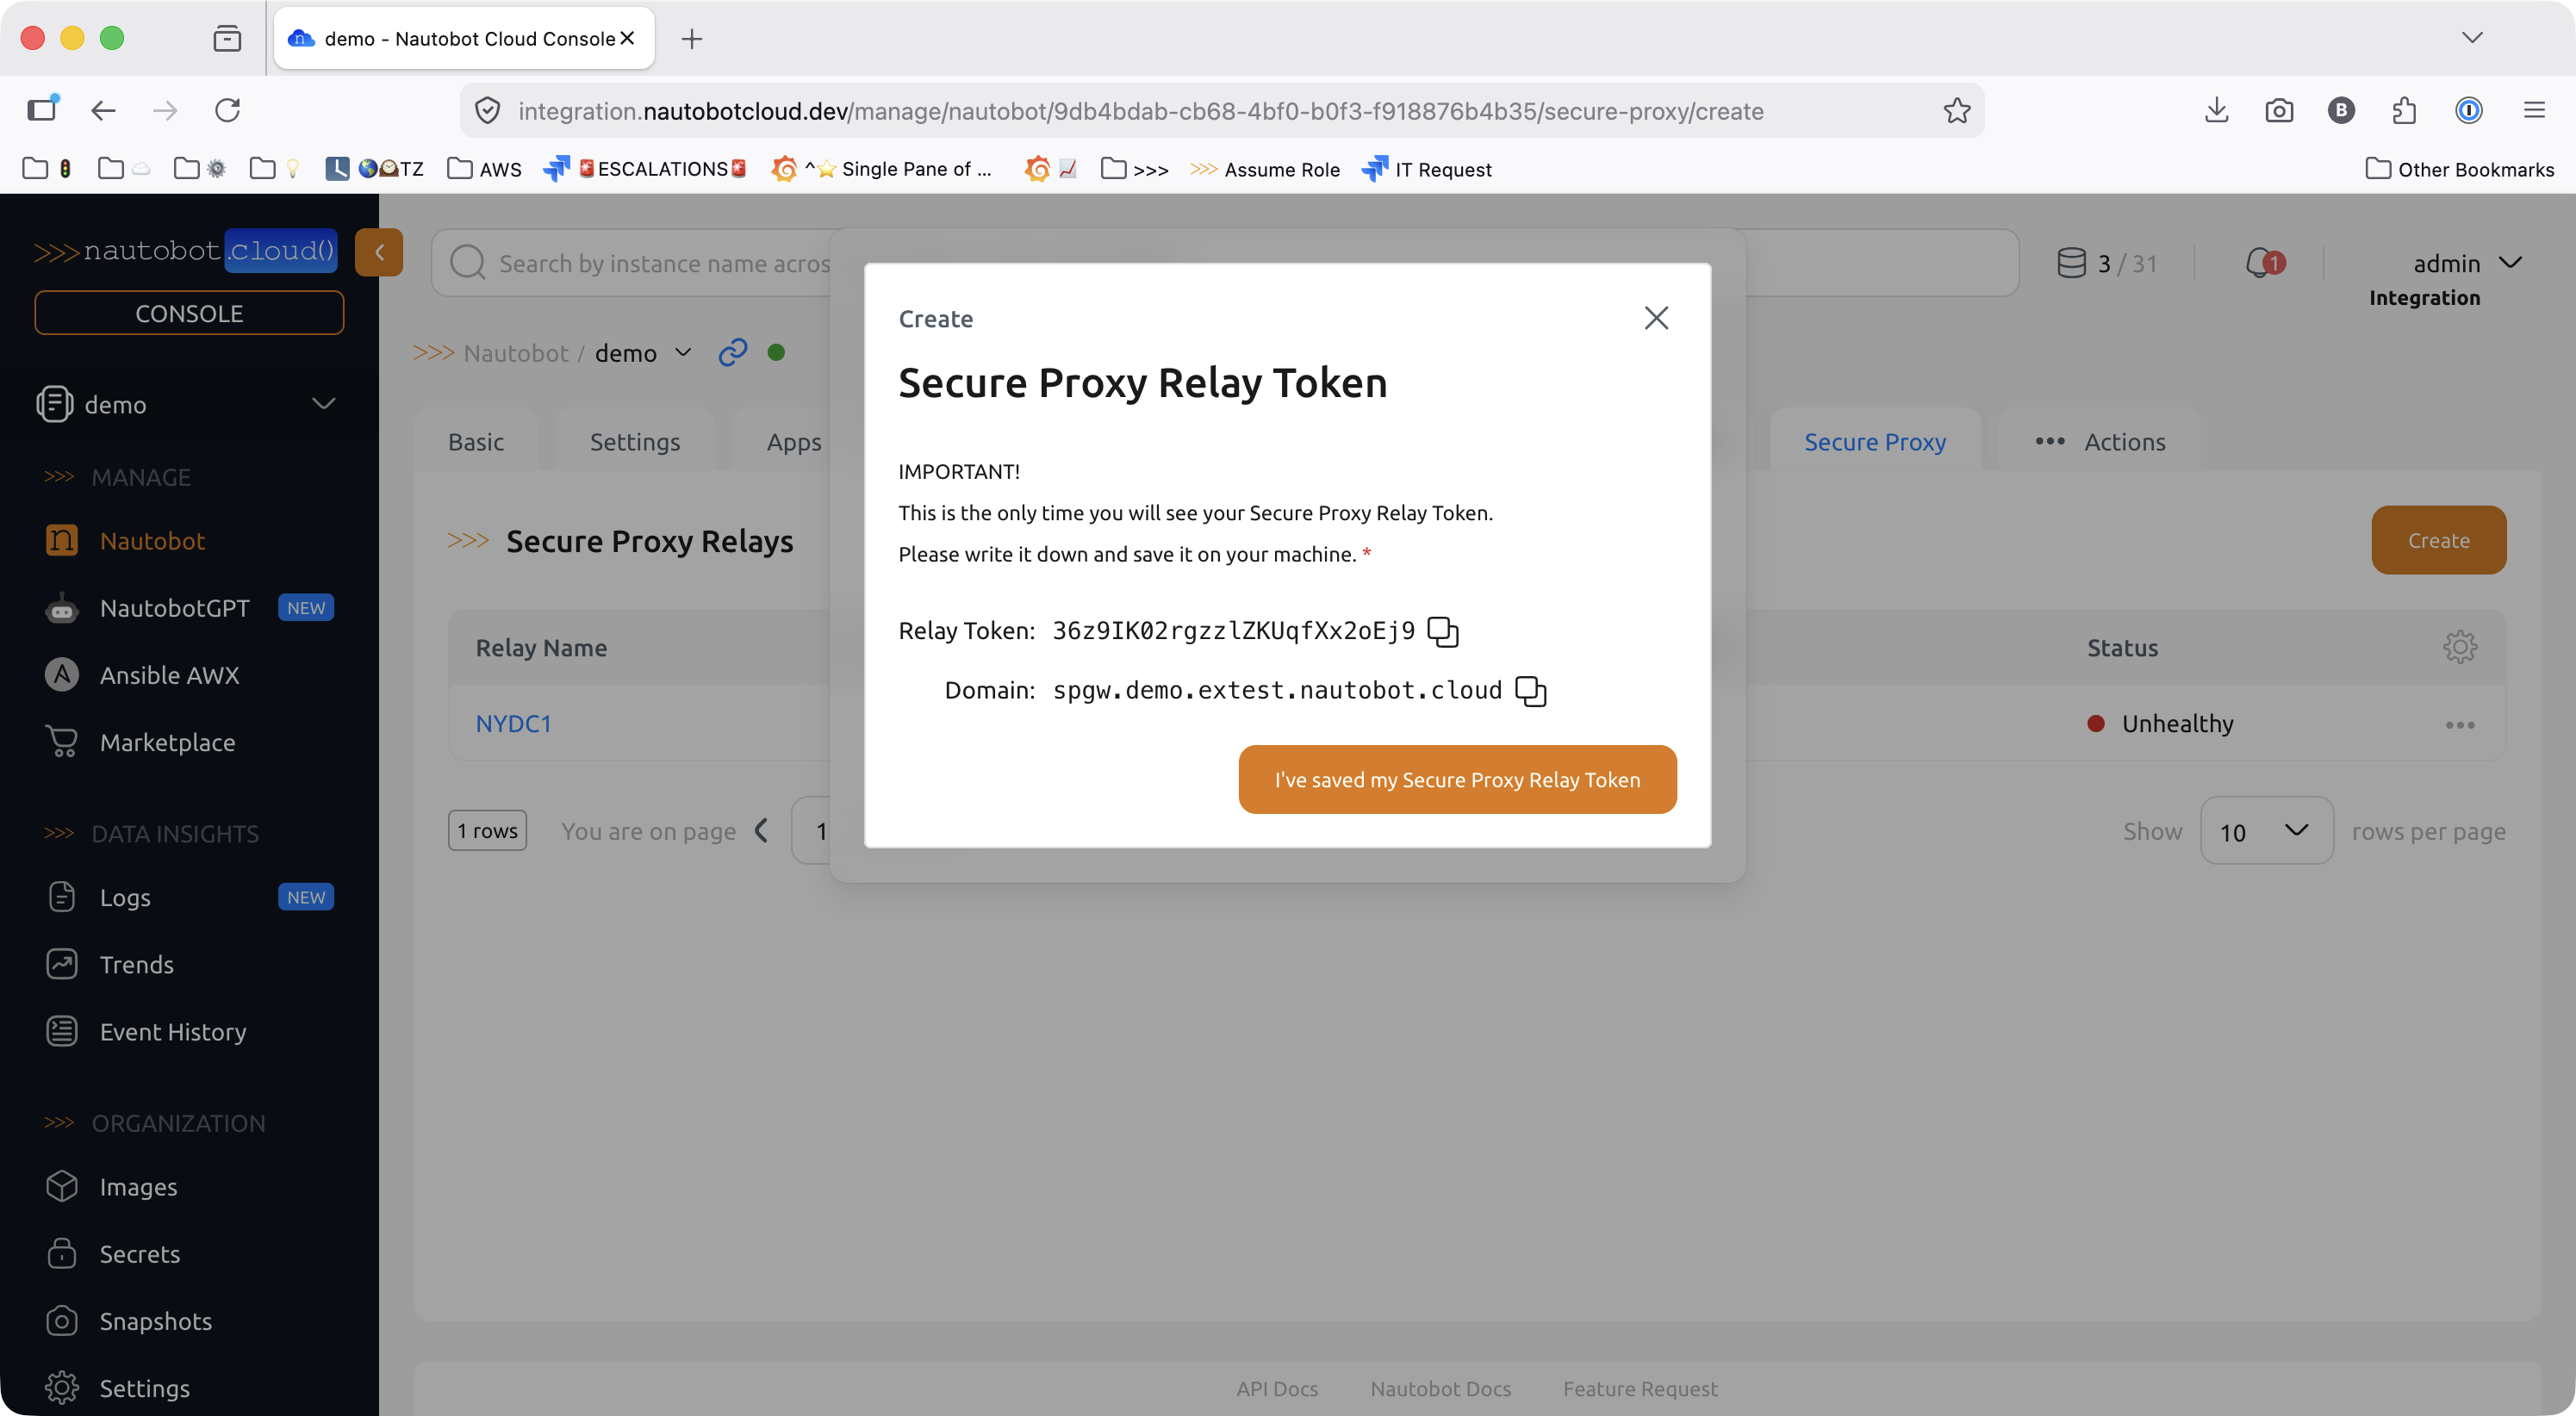
Save your token immediately
The Relay Token is shown only once. Copy it to a password manager or secrets store before dismissing the dialog — it cannot be retrieved later. If the token is lost, delete the relay record and create a new one.
The new relay appears in the Secure Proxy Relays list with an Unhealthy status. It stays unhealthy until the relay process is installed, configured with these credentials, and running (see Verify Connectivity).
Install the Relay
The Secure Proxy Relay is distributed as a Python package (ncloud-secure-proxy-relay) which can be installed by Python package managers (e.g. pip, poetry, uv etc.) from an authorized private repository.
Important
Nautobot Professional is commercial (licensed) software. To obtain access to the Network To Code private package repository, please contact us through the customer portal. Then review the instructions on how to set up the repository in your Python package manager of choice.
Install the relay package with pip on your relay host:
Configure the Relay
The relay comes with a command to help you set up the registration. Run the following command and follow the prompts:
You will be asked to enter the gateway domain (ex: spgw.instance.yourorg.nautobot.cloud) and your Relay token. The command will validate your credentials by attempting to connect to the gateway, and if successful, it will generate a config file for you at /etc/ncloud-relay/config.yaml.
Starting the Relay (Non-Daemon Mode)
Start the relay with:
On a successful connection you will see log output similar to:
[info] Connected to gateway  url=wss://spgw.instance.yourorg.nautobot.cloud:443
[info] Relay registered      job_queue=your-org-queue
Note: This command runs the relay in the foreground. For production deployments, it is recommended to run the relay as a systemd service (see below).
HTTP/HTTPS Proxy Support
If your network requires outbound traffic to go through an HTTP or HTTPS proxy, set the standard proxy environment variables before starting the relay:
export https_proxy=http://proxy.example.com:3128
ncloud-relay run --config /etc/ncloud-relay/config.yaml
Install as a systemd Service
For production deployments, run the relay as a managed systemd service so it starts automatically on boot and restarts on failure.
Run the following command as root to install, enable, and start the service in one step:
This generates a systemd unit file at /etc/systemd/system/ncloud-relay.service, runs systemctl daemon-reload, enables the service, and starts it immediately. The service expects your configuration at /etc/ncloud-relay/config.yaml.
To check the service status:
Verify Connectivity
Once the relay is running and registered, verify it is connected from the Cloud Console:
- Navigate to the Secure Proxy tab on your Nautobot instance.
- Locate your relay in the Secure Proxy Relays list — its status should transition from Unhealthy to Healthy within a few seconds of the process connecting to the gateway.
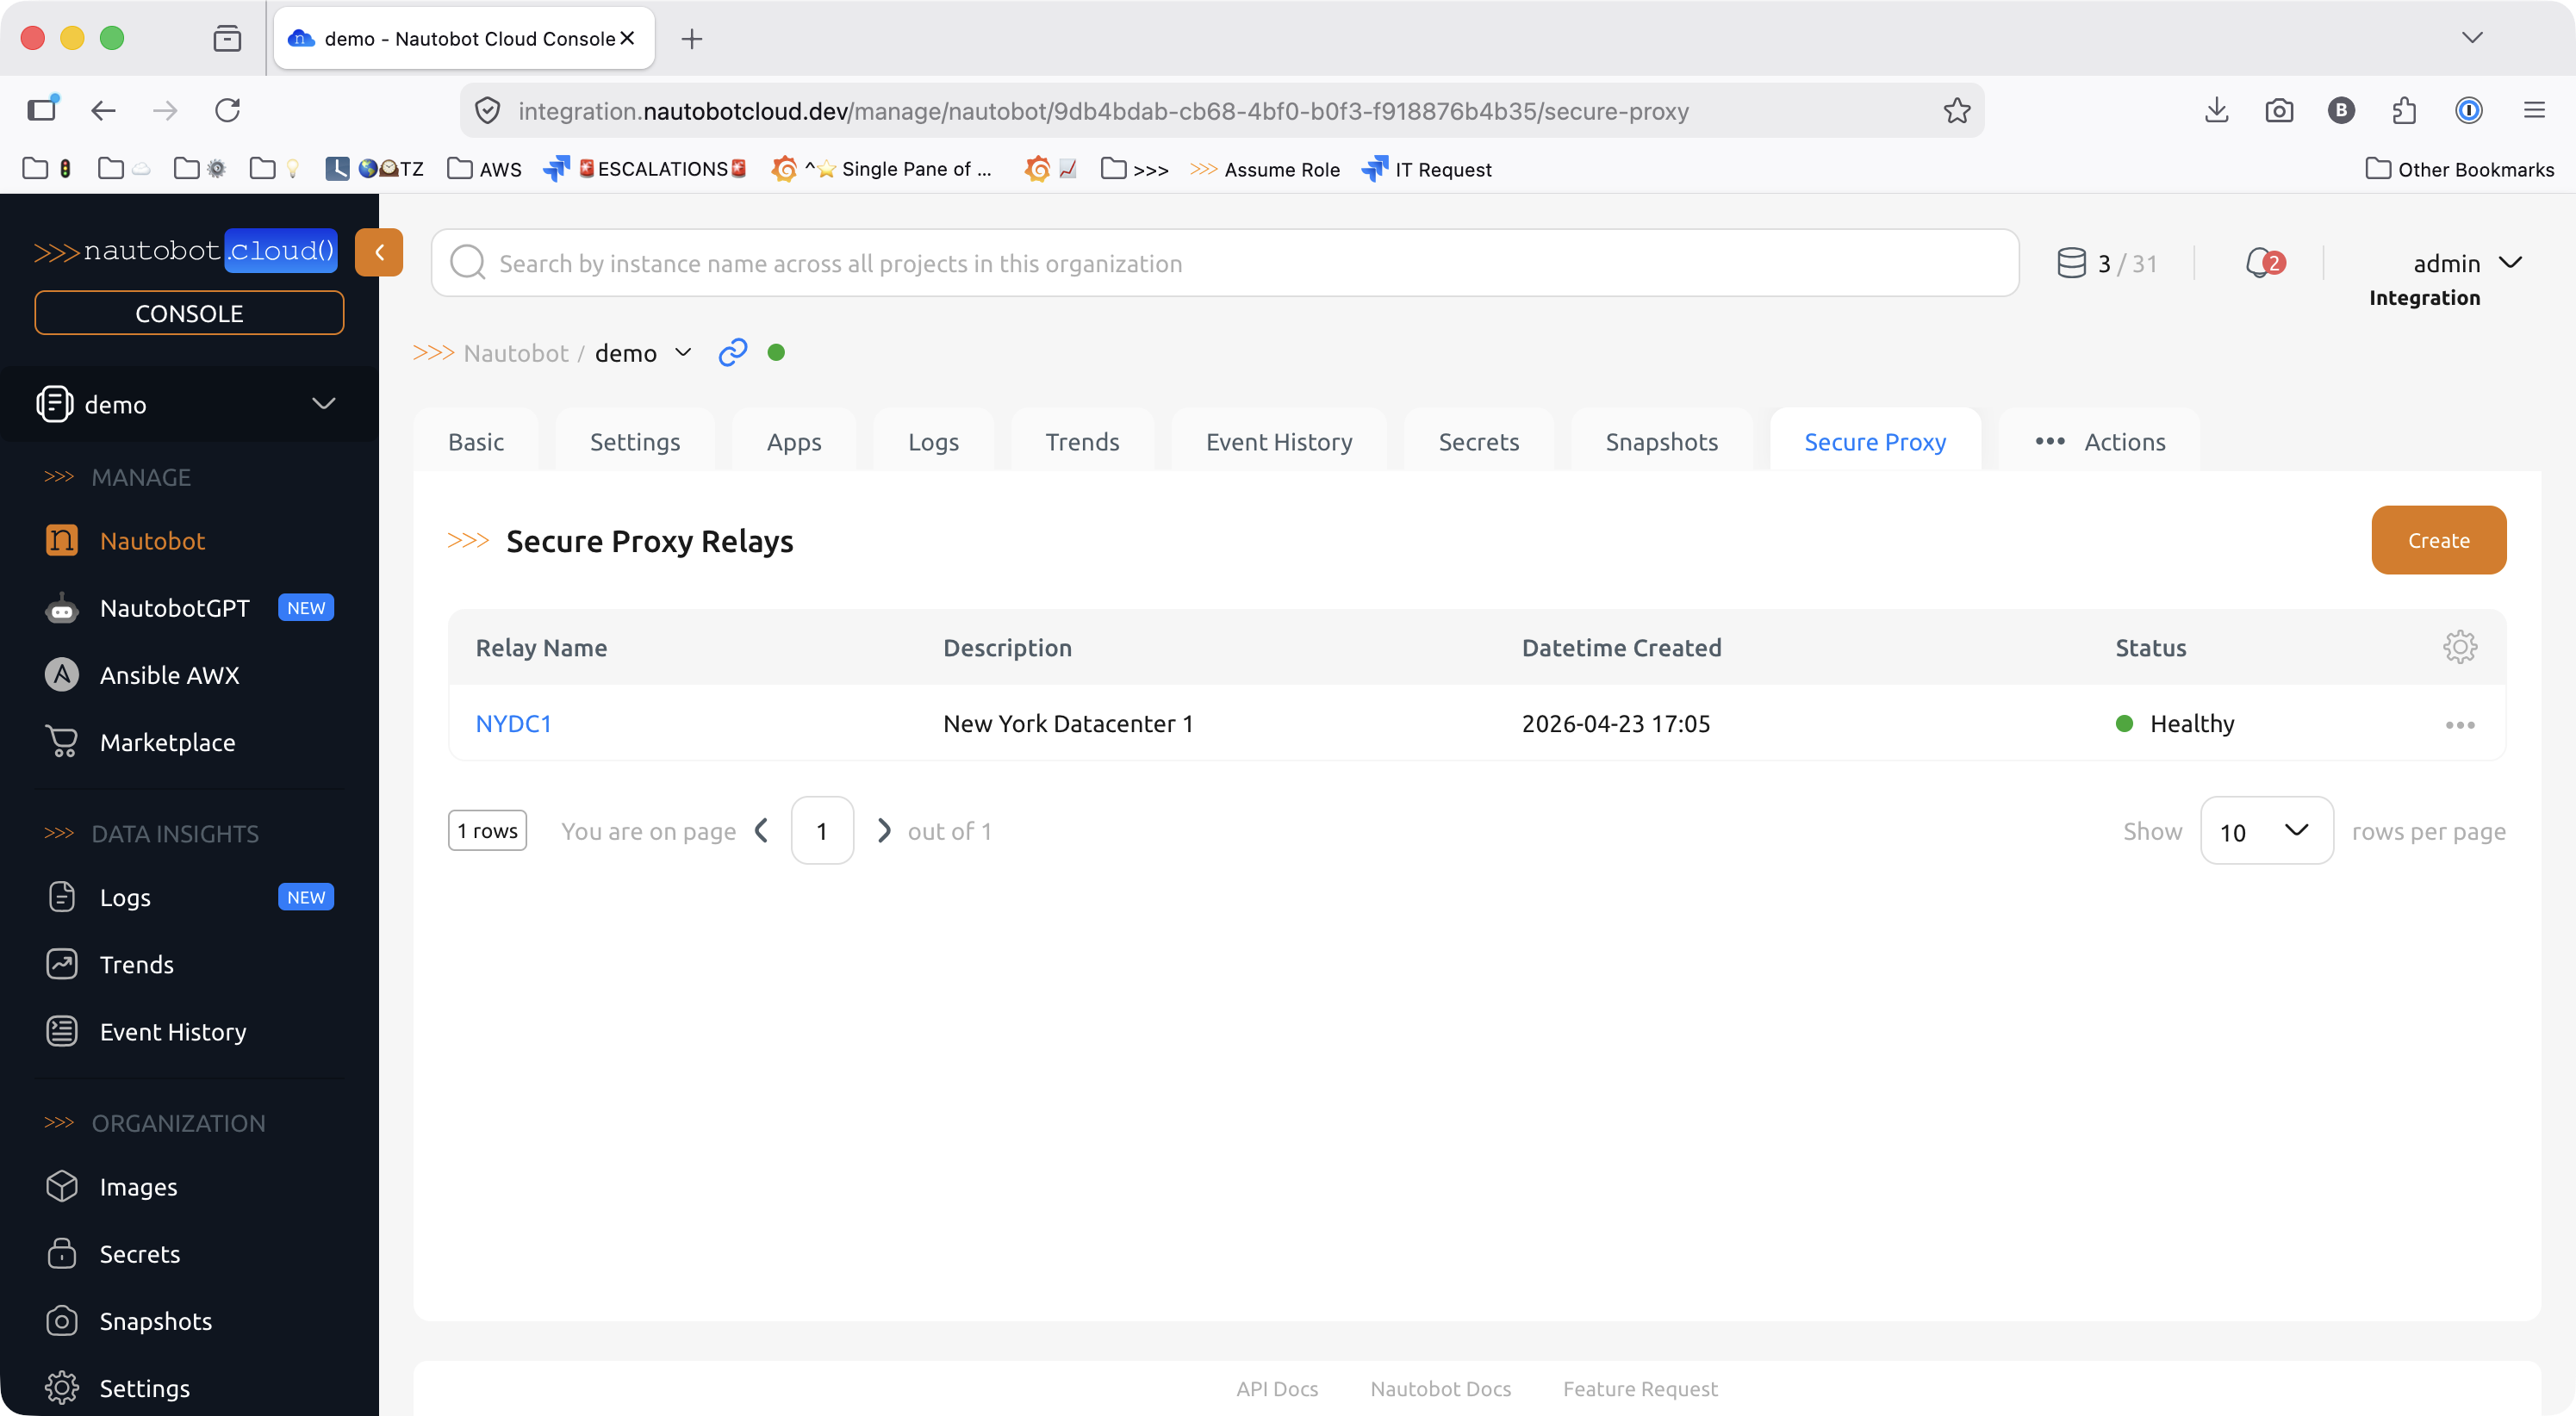
You can also monitor the relay's built-in health endpoint inside your local network. Set http_server_enabled: true in the relay config (it is disabled by default) to start an HTTP server — default port 8080 — that exposes a /healthz endpoint returning 200 OK when the relay is connected to the gateway and 503 Service Unavailable when it is not, along with a /metrics endpoint.
Routing Jobs Through the Relay
A healthy relay is the networking half of the picture. To actually send job traffic through it, pair it with a Kubernetes Job Queue in Nautobot and run jobs on that queue. Worker pods launched for a relay's queue are scheduled with tunneled network access to the relay's site.
Create the Kubernetes Job Queue
Add a Job Queue in Nautobot whose name matches the relay record you created in the Cloud Console.
- In Nautobot, navigate to Jobs Job Queues and click Add.
- Fill in the form:
- Name — Must match the relay name exactly (e.g.,
NYDC1). - Queue Type —
Kubernetes. - Description — Optional, but a value such as
Secure Proxy Connection: NYDC1makes the queue's purpose obvious to operators.
- Name — Must match the relay name exactly (e.g.,
- Click Create.
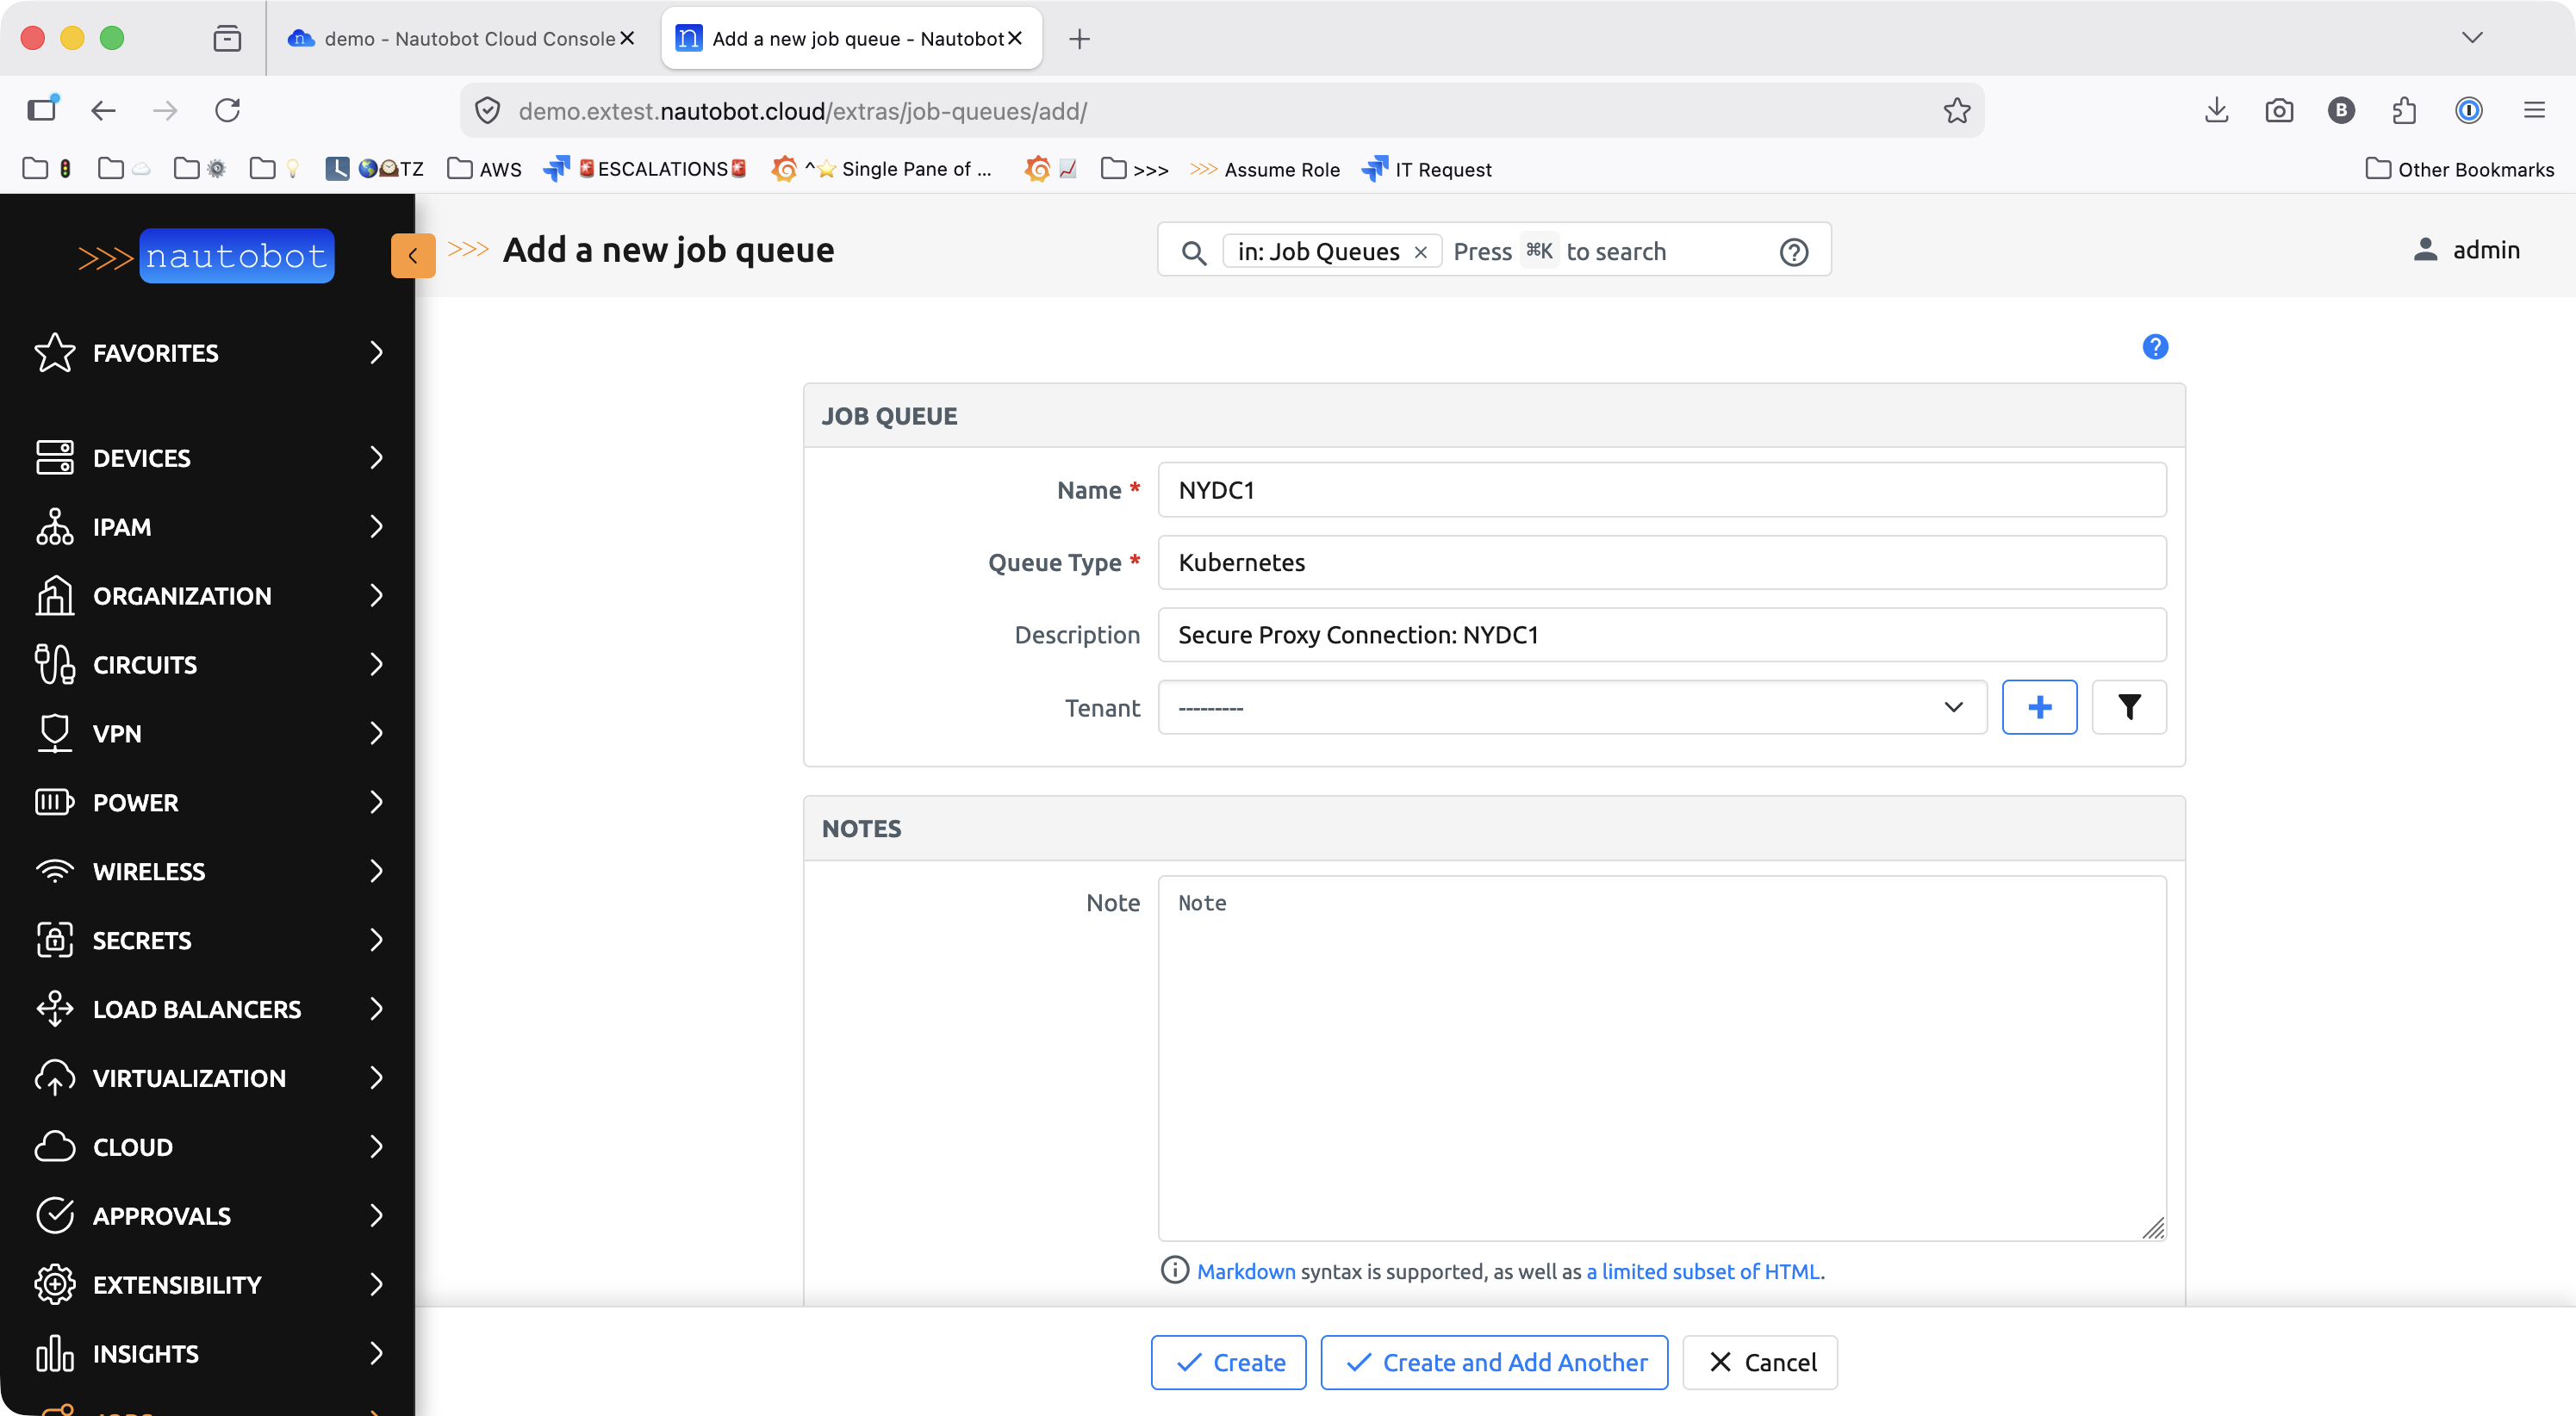
Enable the Queue on a Job
Nautobot jobs only accept submissions on queues listed in their Job Queues setting. Add the new Kubernetes queue to each job that needs to reach devices via the relay.
- In Nautobot, open the job you want to route through the relay (the built-in TCP Ping and Ping (ICMP) jobs under Network Tools are useful for testing).
- Choose Edit Job from the actions menu.
- Scroll to Job Queues, check Override default value, and add
kubernetes: <your-queue>(for example,kubernetes: NYDC1) alongside the existingcelery: default. - Leave Default Job Queue set to
celery: defaultunless you want every run of this job to go through the relay by default. - Click Update.
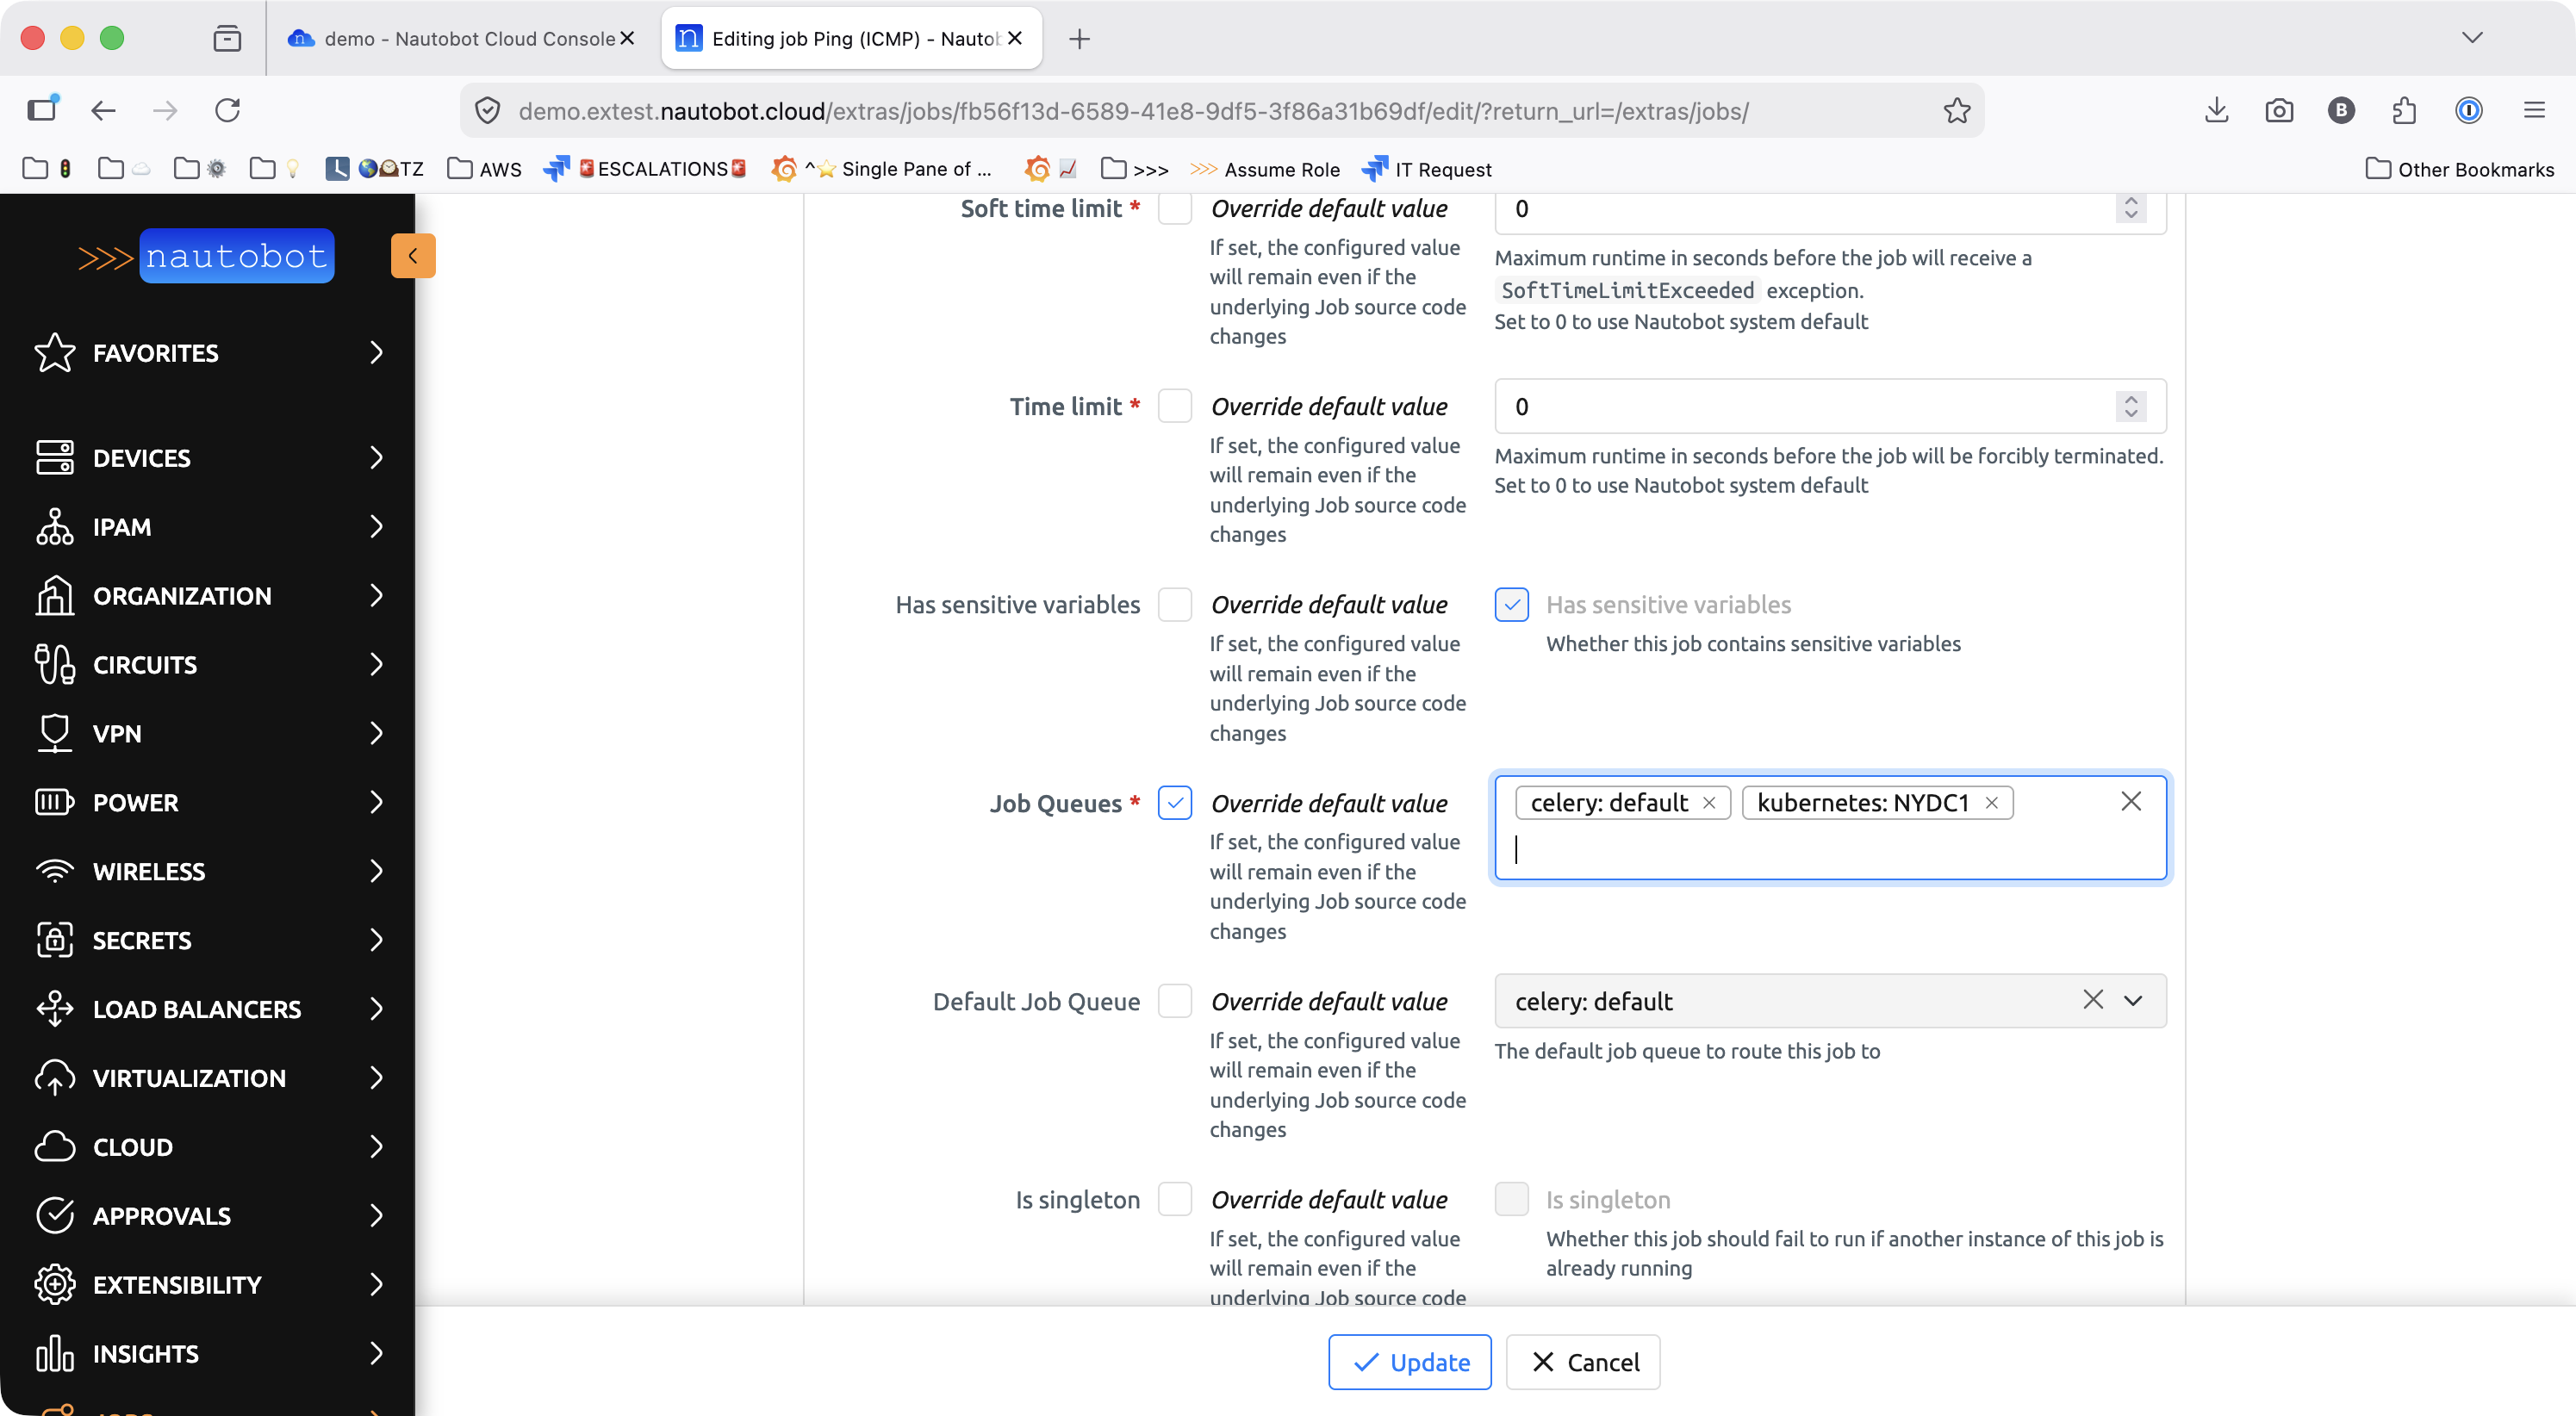
Submitting to a queue that is not enabled
Selecting a Kubernetes queue that has not been added to the job's Job Queues setting fails validation with "Unable to retrieve a Kubernetes job manifest for this job queue." If you see this, go back and enable the queue on the job as described above.
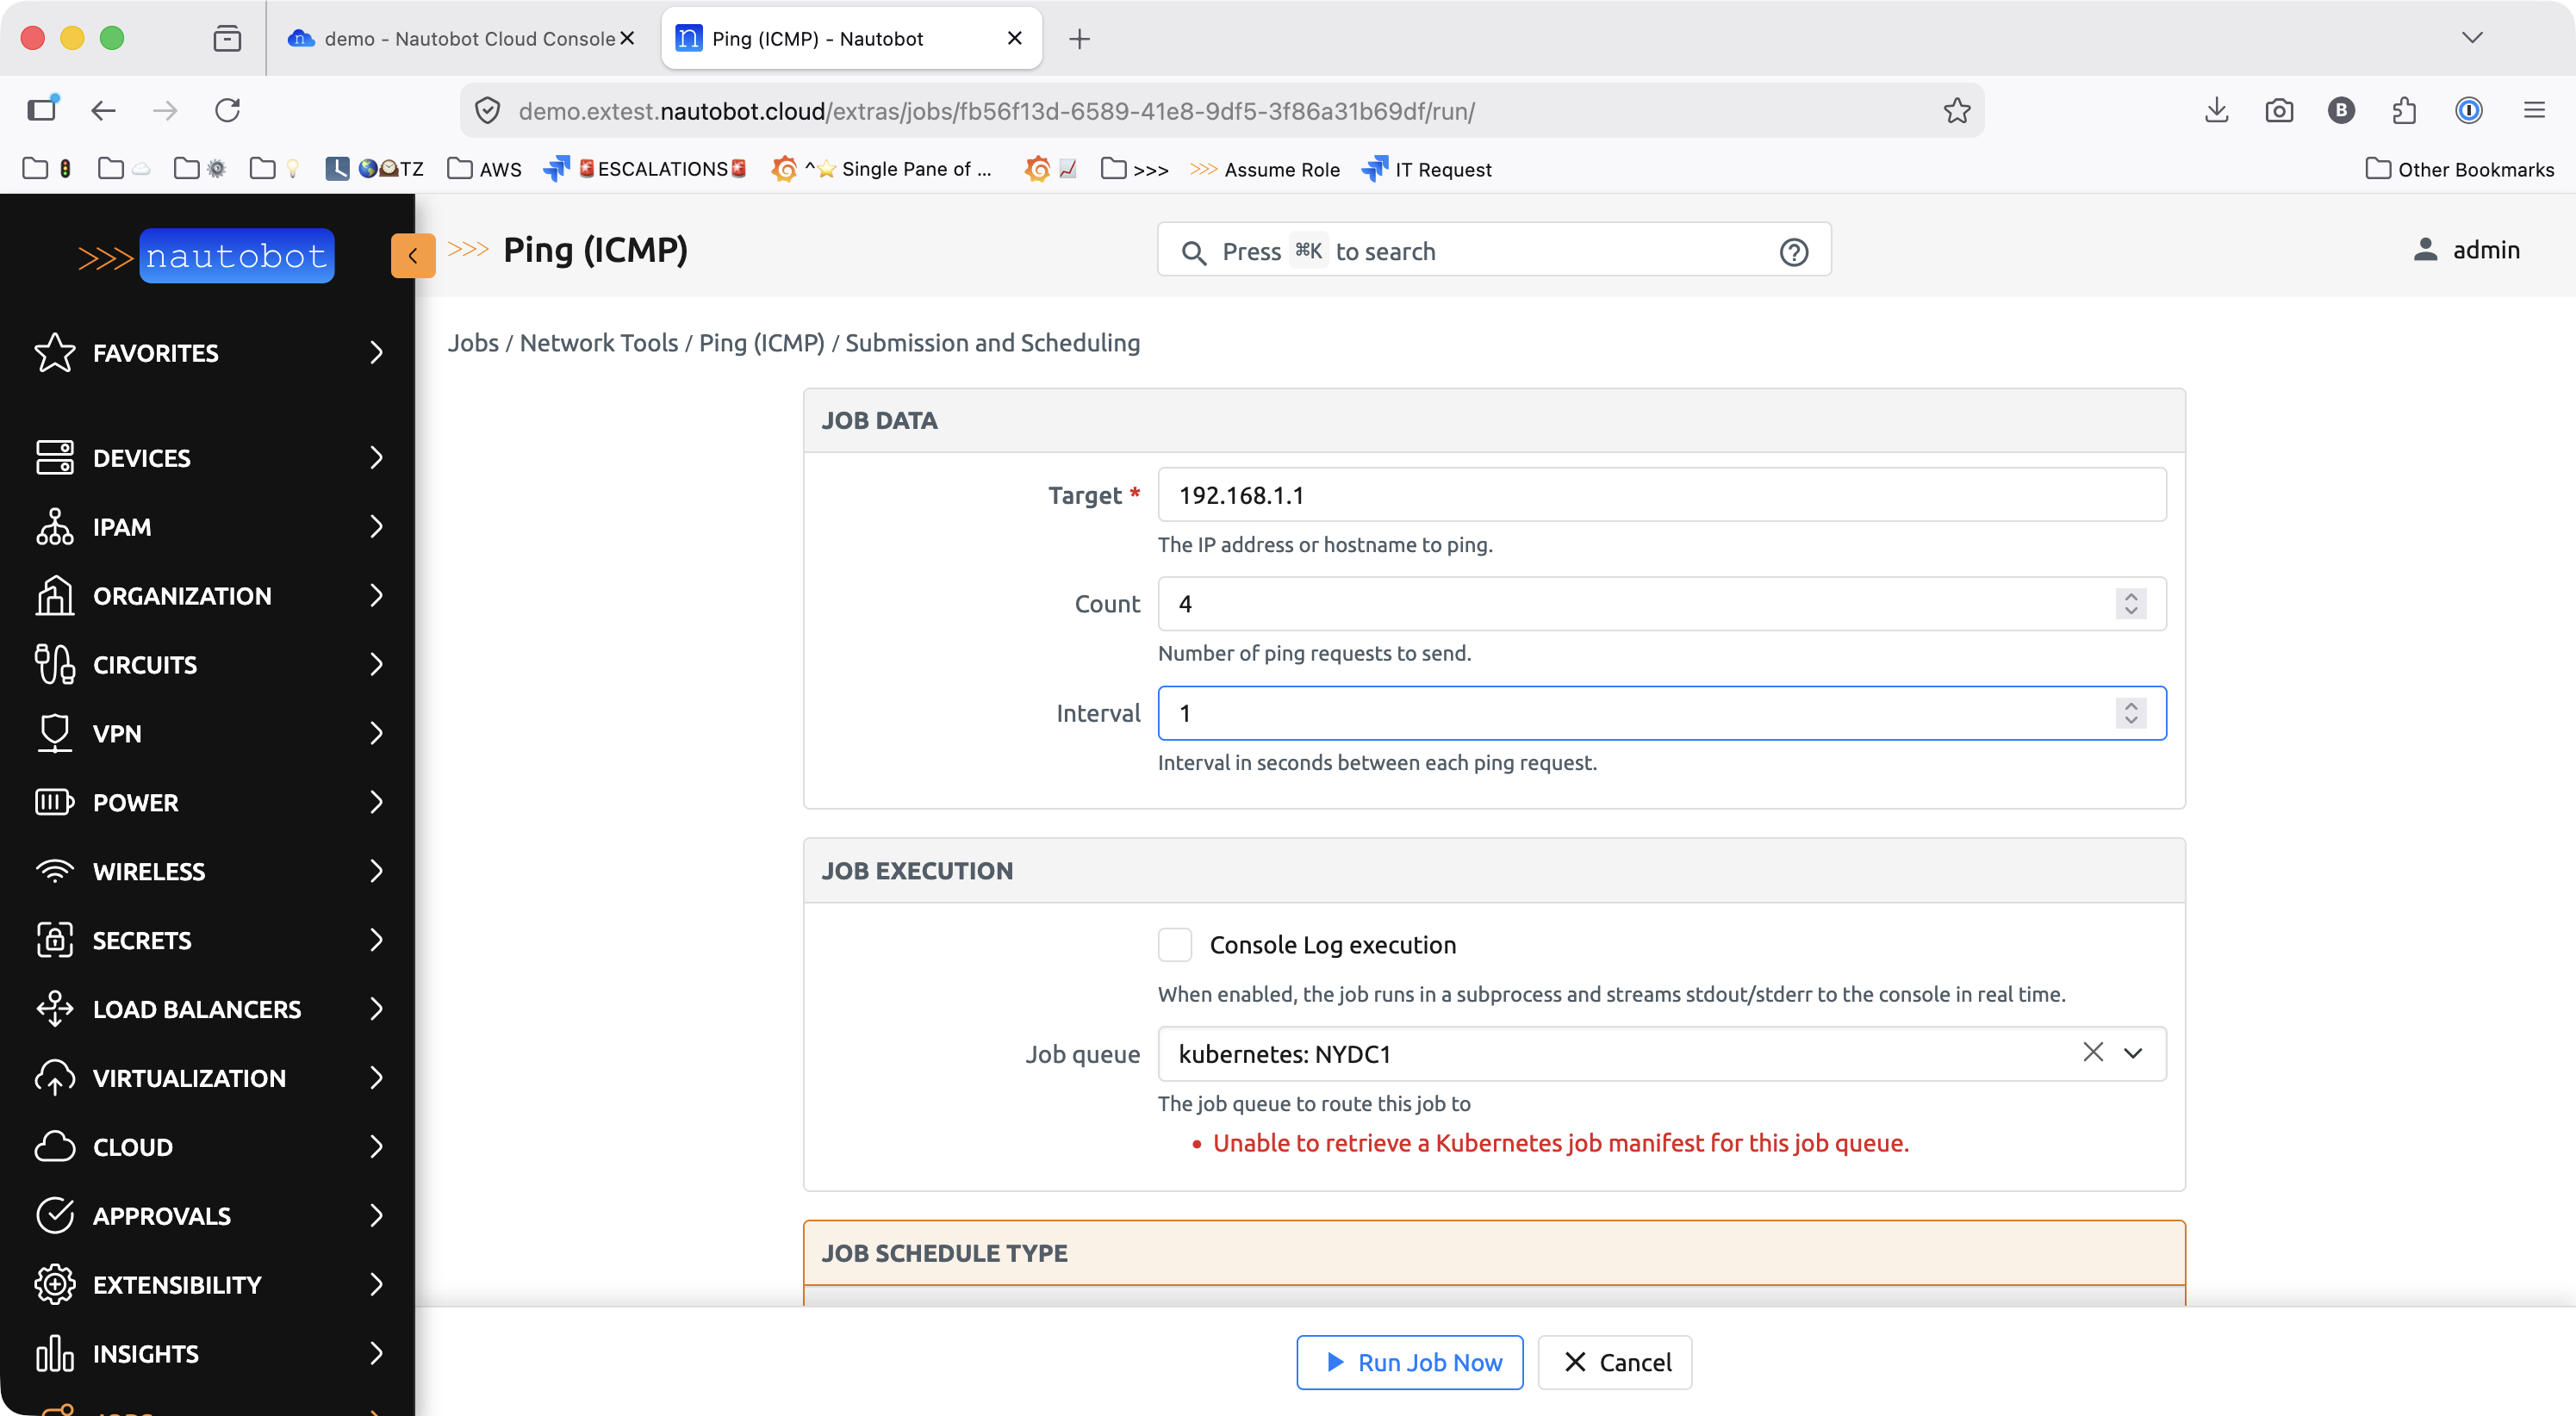
Run a Job Through the Relay
With the queue enabled, submit the job as usual and pick the relay's queue from the Job queue dropdown.
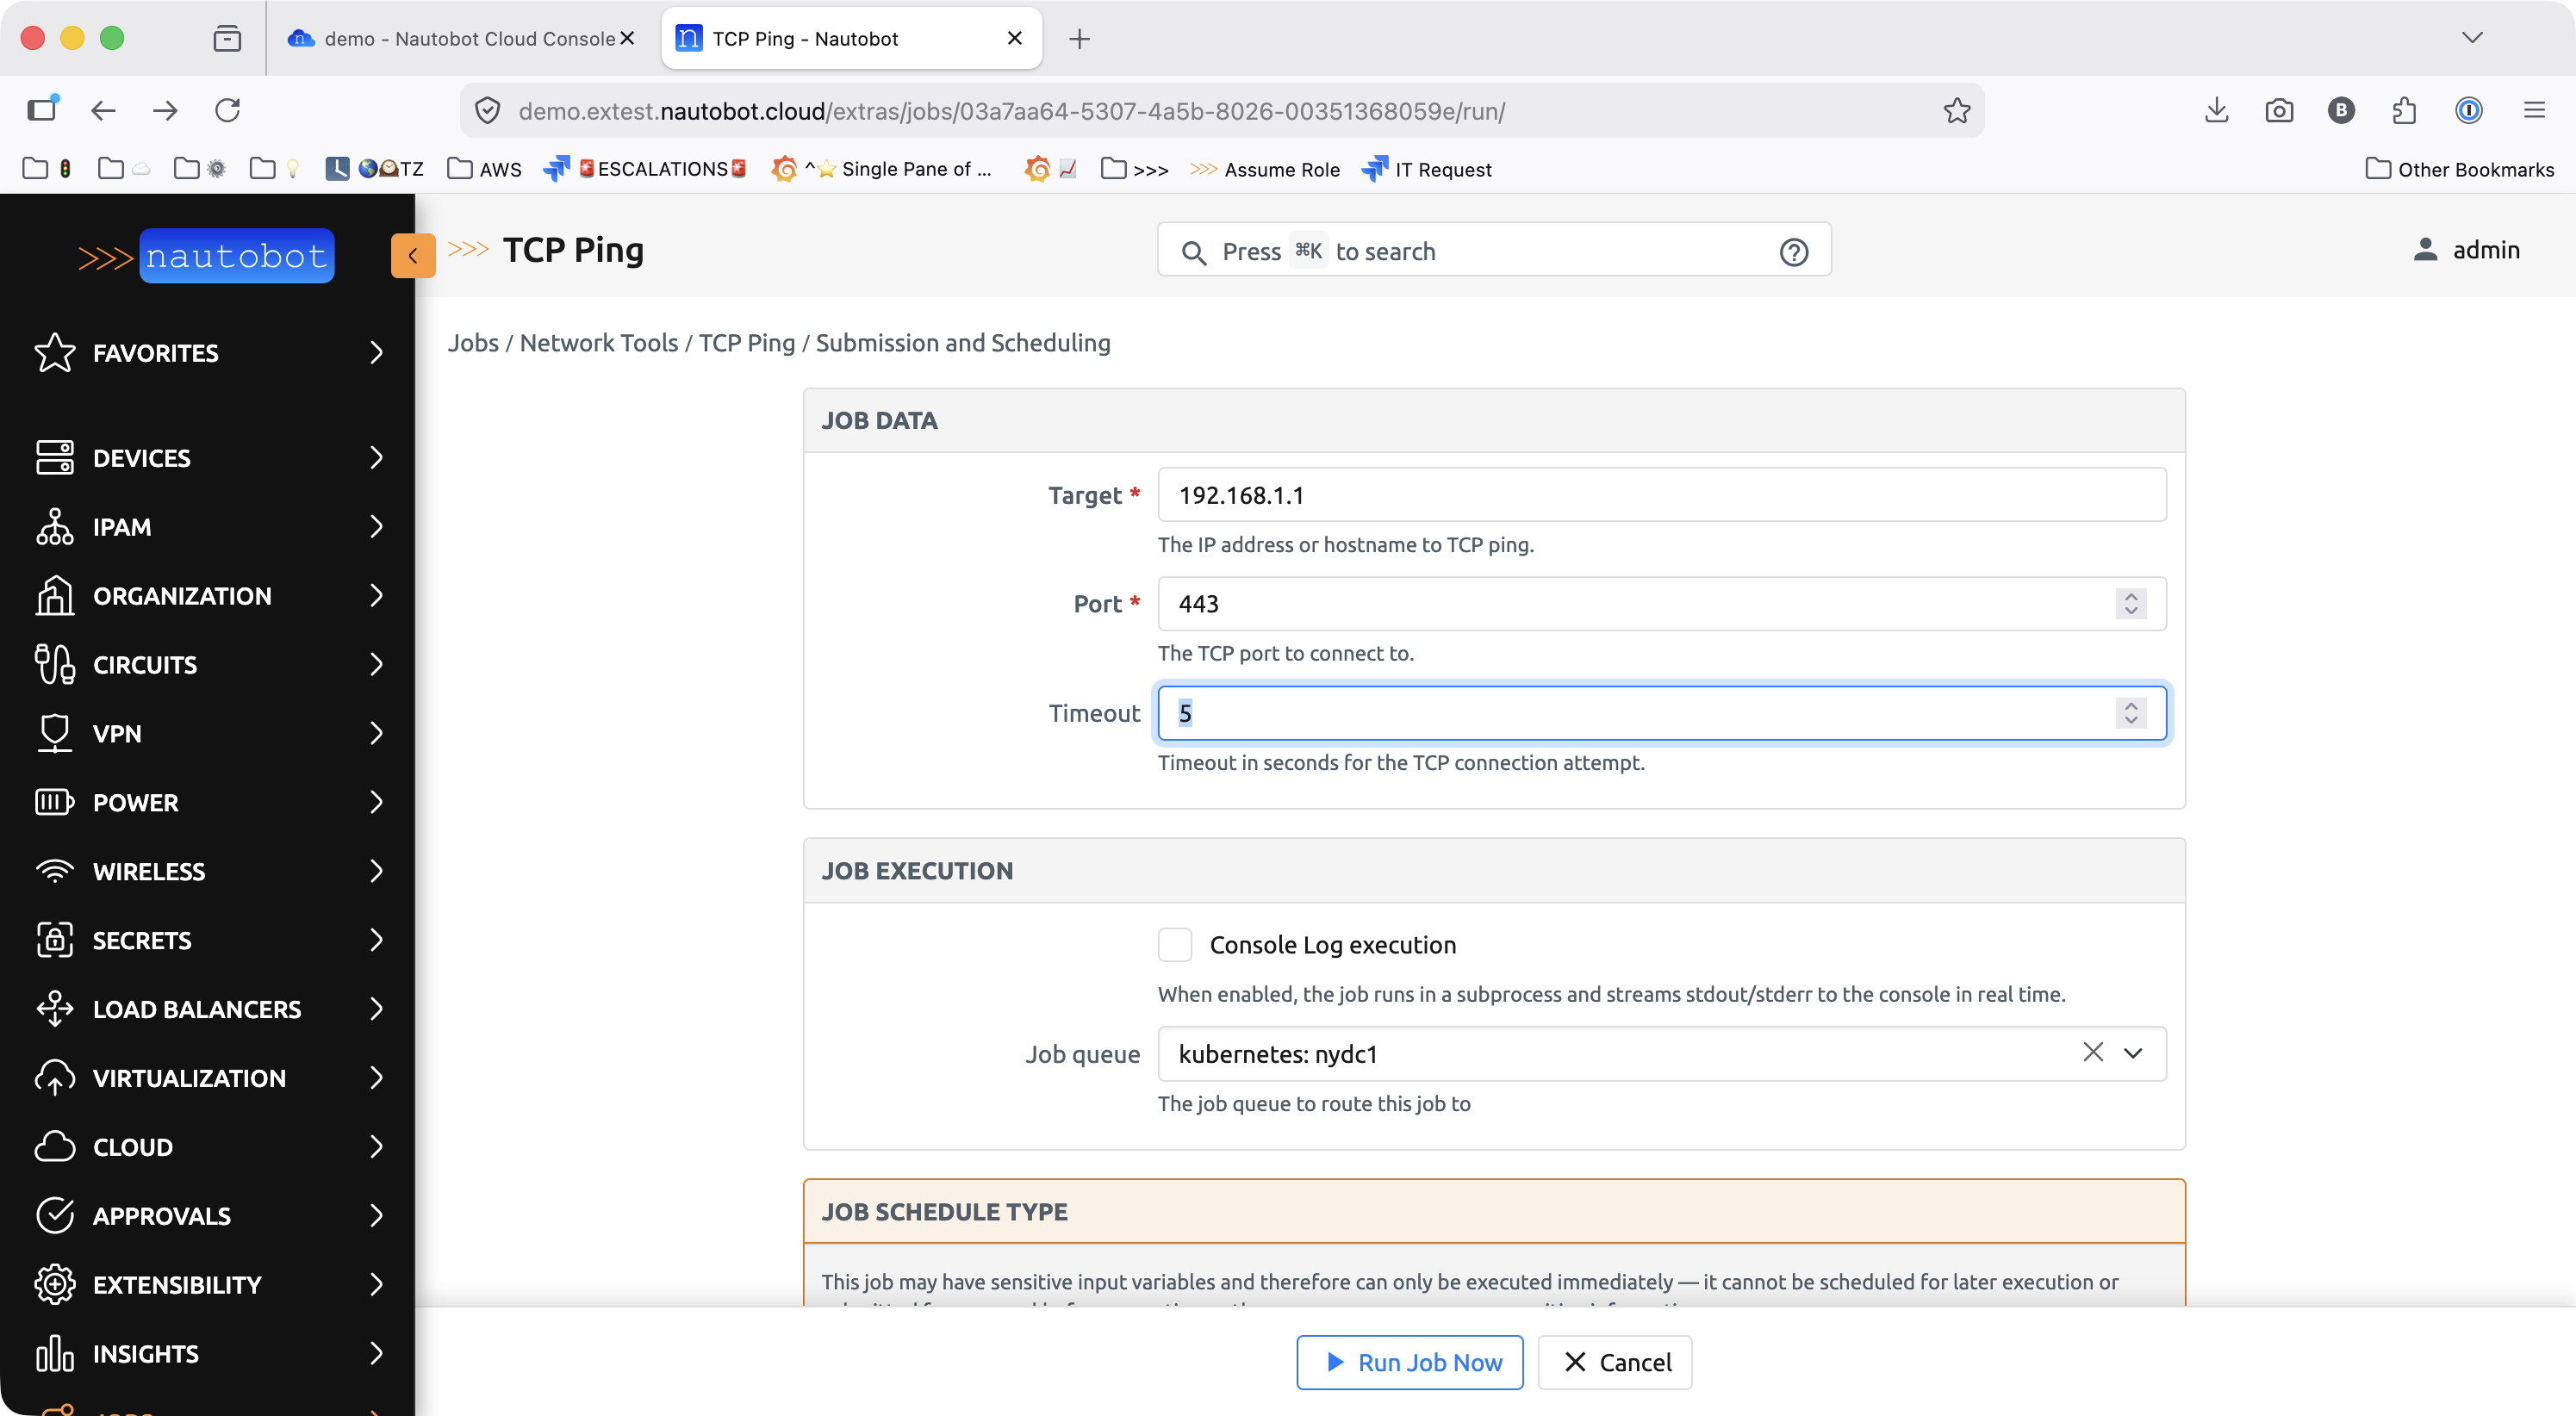
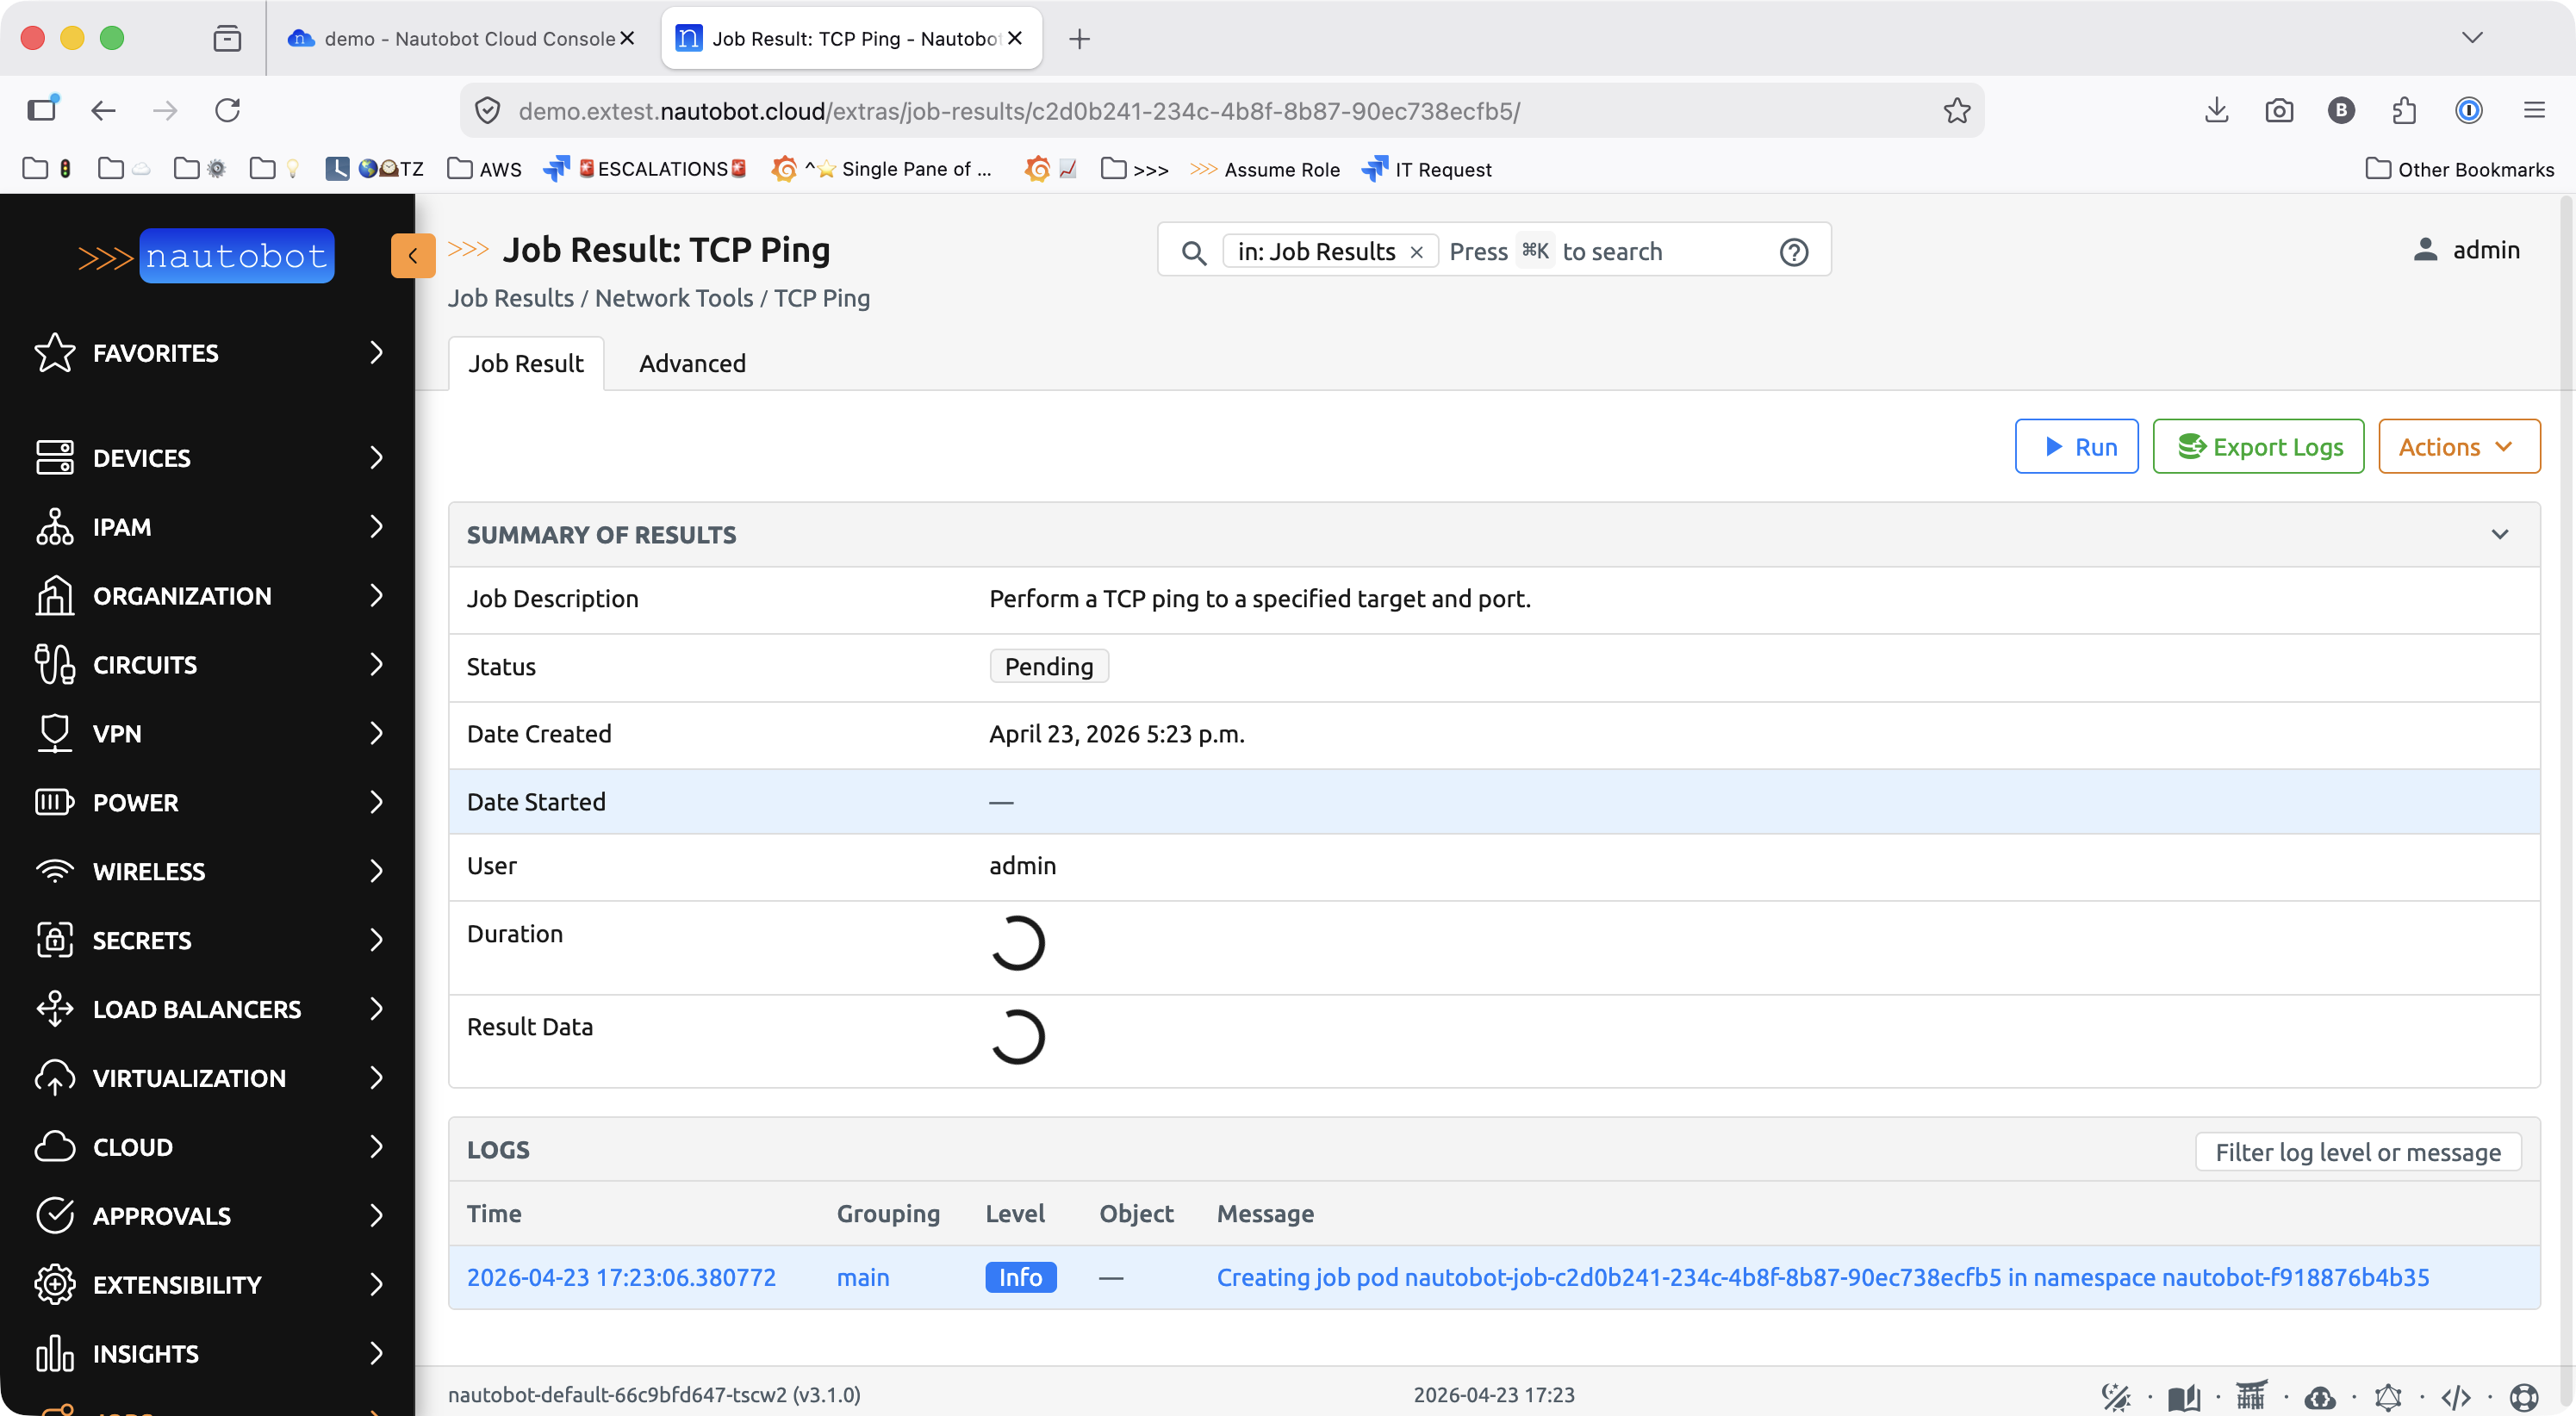
When you click Run Job Now, Nautobot Cloud schedules a Kubernetes worker pod bound to the relay. While the pod starts, the job status is Pending and the first log line shows the pod being created in an isolated namespace.
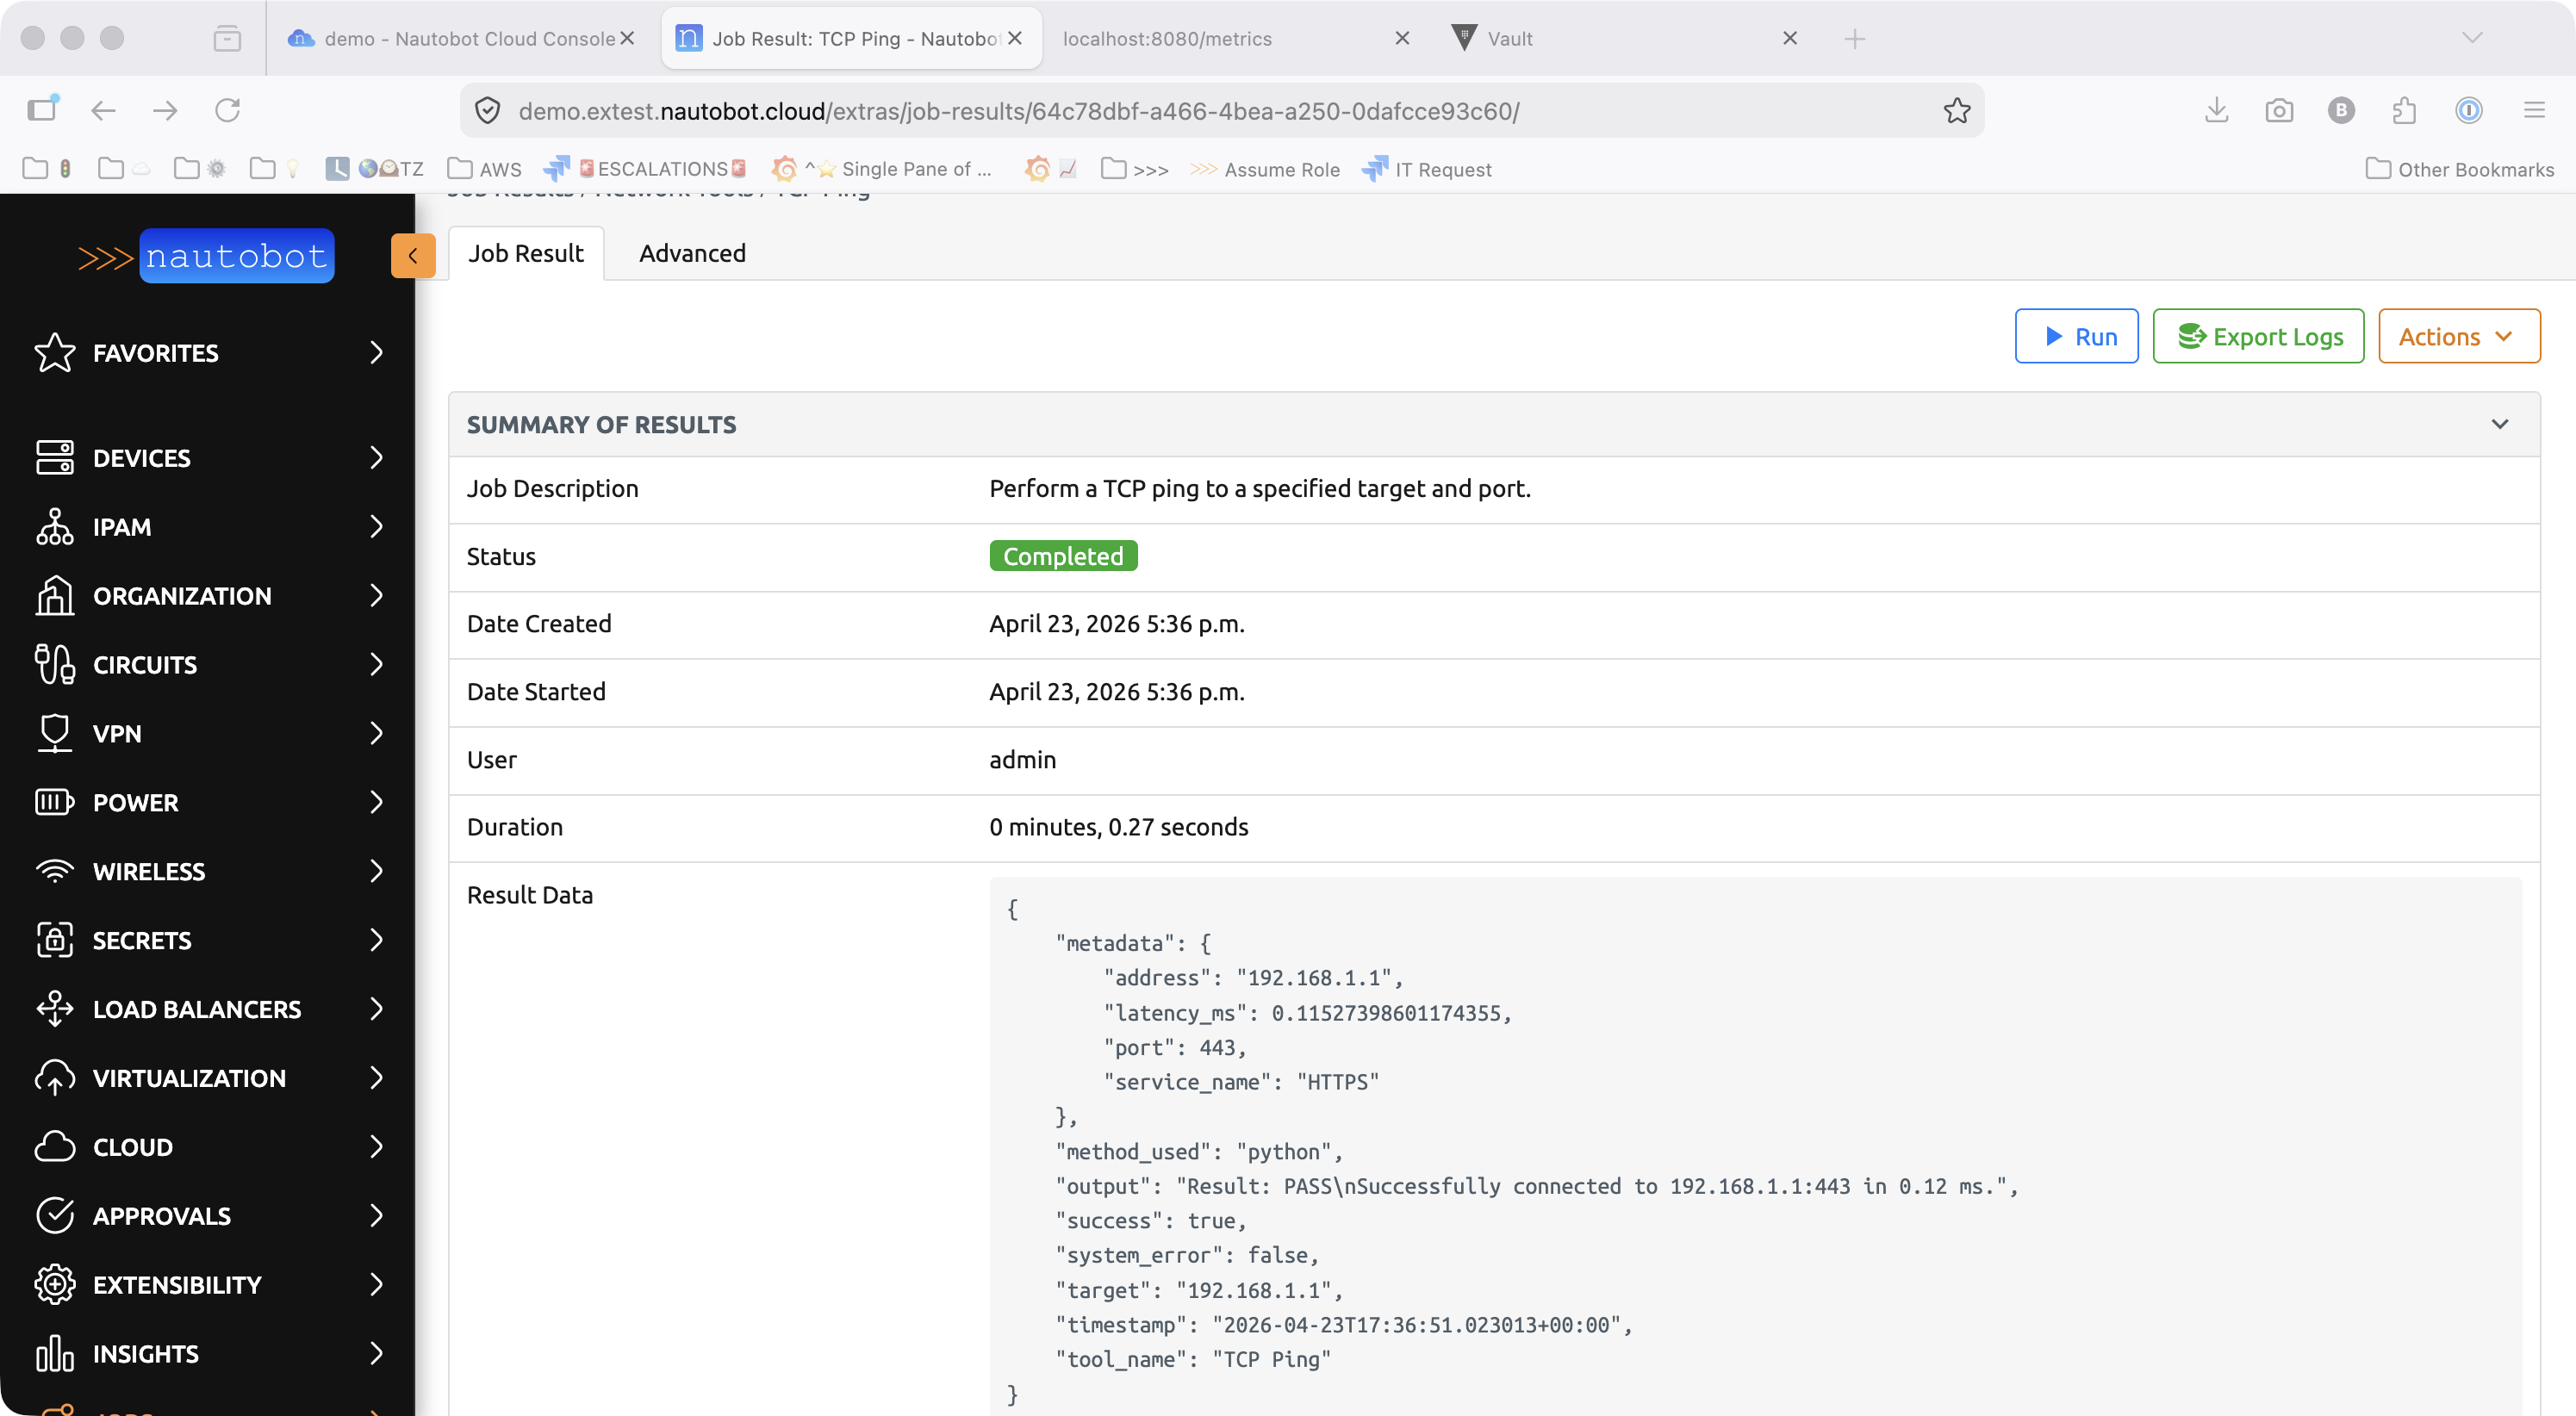
Once the pod is running, the job executes against the target as if it were running inside your network — TCP, UDP, and DNS traffic destined for your registered networks is transparently tunneled through the relay. A successful result includes the target, latency, and a success: true flag in the output.
Configuration File Reference
| Config key | Default | Required | Description |
|---|---|---|---|
server_url |
— | Yes | WebSocket URL of your Nautobot Cloud gateway — the gateway domain shown in the Console when you create the relay. Bare hostnames without a scheme are automatically prefixed with wss://. |
tunnel_psk |
— | Yes | Relay authentication token — the relay token shown once on the instance's Secure Proxy tab when you create the relay. |
tls_ca_file |
System CA | No | Path to a CA certificate for gateway TLS verification. Only required if your organization uses a private certificate authority. |
heartbeat_interval |
5 |
No | Seconds between keep-alive messages sent to the gateway. |
udp_idle_timeout |
60 |
No | Seconds of inactivity before an idle UDP tunnel session is closed. |
reconnect_delay |
1 |
No | Initial delay in seconds before reconnecting after a dropped connection. |
http_server_enabled |
false |
No | Set to true to enable the /healthz and /metrics HTTP endpoints. |
http_server_listener_ip |
0.0.0.0 |
No | IP address the health/metrics server binds to. |
http_server_listener_port |
8080 |
No | Port for the health/metrics server. |
log_level |
INFO |
No | Log verbosity. One of DEBUG, INFO, WARNING, ERROR. |
Troubleshooting
Relay stays Unhealthy in the Secure Proxy Relays list
- Check relay logs for connection errors — look for
Failed to connectorAuthentication failed. - Confirm the
server_urlandtunnel_pskmatch the values in the Cloud Console. - Verify the relay host has outbound TCP access to the gateway URL and port.
- If the gateway uses a private TLS certificate, ensure
tls_ca_fileis set and the file is readable.
Job submission fails with "Unable to retrieve a Kubernetes job manifest for this job queue"
The selected Kubernetes queue is not enabled on the job. Edit the job, add the queue to its Job Queues setting, and resubmit. See Enable the Queue on a Job.
Worker jobs cannot reach devices in my network
- Verify the relay host itself can reach the target device (e.g.,
pingortelnetfrom the relay host). - Check relay logs for
tunnel_initmessages — these appear each time a new connection is established through the tunnel. - Please reach out to support if you see connection attempts in the logs but the target device is not reachable from your jobs.
DNS resolution is not working for internal hostnames
The relay reads /etc/resolv.conf at startup and sends those nameserver addresses to Nautobot Cloud. Confirm your relay host's /etc/resolv.conf contains your internal nameservers. If you update it after the relay has started, restart the relay service to pick up the changes.