Environments & Promotion
This guide describes Network to Code's recommended workflow for building, testing, and promoting changes across separate environments in Nautobot Cloud — a Development → Staging → Production lifecycle. It applies to any change you make to a Nautobot instance: a new or updated custom App, pip dependencies, static files, Jobs, App configuration, or a Nautobot version upgrade.
Recommended Environment Layout
Run a separate instance for each environment — such as Development, Staging, and Production:
| Environment | Purpose | Suggested setup |
|---|---|---|
| Development | Build and iterate on changes. Break things safely. | Refresh data from Production snapshots as needed. |
| Staging | Validate the exact change against Production-like data and real integrations before it ships. | Same connectivity/SSO/Secrets as Production. |
| Production | Your live instance. | Prevent Delete enabled. Scheduled snapshots enabled. Change only via promotion. |
Group the instances with a Project and use a consistent naming convention (for example dev, stg, and prod prefixes) so the environment is obvious from the instance name and URL.
Create each environment like any other instance. To stand up a lower environment that mirrors Production, create it from the current Production Image, then restore a Production Snapshot for data.
What Moves Between Environments
Two things flow between environments, in opposite directions: the image (your change) moves forward — Development → Staging → Production — while data moves backward — a Production Snapshot restored into a lower environment for realistic testing. Each uses a different mechanism:
| What | Includes | How it moves |
|---|---|---|
| The image | Base Nautobot version, installed Apps (Marketplace, PyPI, uploaded), pip dependencies, static files, and App configuration (PLUGINS_CONFIG) |
Copy Image From… (promotes the exact same image — no rebuild) |
| The data | The instance database — devices, IPs, Jobs results, users, etc. | Snapshot & restore |
Secrets, network connectivity, custom domain, and environment-specific settings stay with each environment — they are not copied during promotion. Set them up once per environment (Production credentials should never live in Development).
Promote the image: Copy Image From…
The Copy Image From… action (on the target instance) replaces that instance's image with another instance's — applying the exact same image, byte-for-byte, with no rebuild. You pick a Source Instance, and:
- Replaced on the target (copied from the source instance):
- Base Nautobot image & version
- Installed Apps (Marketplace, PyPI, uploaded)
- Static files
- Pip dependencies
- App configuration (
PLUGINS_CONFIG)
- Preserved on the target:
- Database, users, and all data
- Secrets & API tokens
- Hostname / URL
- Environment-specific settings
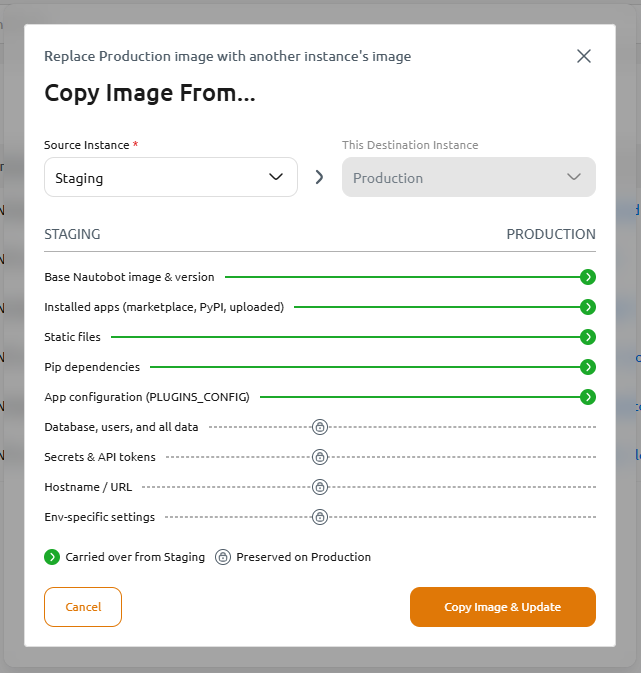
Because the image digest is identical, Staging and Production run precisely what you validated in Development — there's no "works in Development, rebuilt differently for Production" risk. After copying the image, you Update the instance to roll it out.
Seed data: snapshot & restore
To test against realistic data, restore a Production Snapshot into a lower environment. A restore overwrites the target's database, so only do it on a non-Production instance.
Restore compatibility and ordering
A Snapshot restores only onto an instance whose Image is compatible with the Snapshot's source — the same Nautobot major version (same or newer) with the same set of Apps (same or newer). See Restore Compatibility. So to restore a Production Snapshot, the target must be on the same image (or newer).
To faithfully rehearse a Production change, seed the data at the Production baseline first, then apply the change: match the target to Production (same image + restored Production data), then Copy Image From… the environment you're promoting from. Applying the new image to Production-like data runs the same migrations Production will.
The Lifecycle
flowchart LR
    Dev["Development"] -->|"Copy Image From & Update"| Staging["Staging"]
    Staging -->|"Copy Image From & Update"| Prod["Production"]
    Prod -.->|"Snapshot restore (real data)"| Dev
    Prod -.->|"Snapshot restore (real data)"| Staging
Images are promoted forward (Development → Staging → Production); Production data flows backward into the lower environments for realistic testing.
1. Build and iterate in Development
- Create (or reuse) a Development instance.
- Make your change — for example upload a custom App, add a pip dependency, upload static files, adjust App configuration, or point the instance at a new base Image for a version upgrade.
- Update the instance to build the image and deploy it, then test.
- Iterate (e.g. for an App you're developing, upload a new package build, Update, and re-test). Repeat until it works.
- (Optional) Restore a recent Production Snapshot into Development to develop against realistic data. (This is exploratory; the faithful rehearsal — Production data in place before the change is applied — happens in Staging, next.)
2. Promote to Staging
Rehearse the change against Production-like data, in the same order Production will apply it:
- Start from a Production baseline. Ensure Staging is running the current Production image — if it isn't, run Copy Image From… → (Production) and Update.
- Restore a Production Snapshot into Staging. Staging is now a faithful copy of Production — the current Production image plus Production data. (Because the images match, the restore is compatible.)
- Promote the change: run Copy Image From… → (Development), then Update. Applying the new image to the Production-like data runs the same database migrations and startup that Production will — this is the real test.
- Confirm the environment's integrations are wired up: associated Secrets, network connectivity, SSO, Git repositories for Jobs, and any external systems. Then run your acceptance / UAT tests end-to-end — App behavior, Jobs, integrations, and SSO sign-in.
3. Promote to Production
- Take a fresh Snapshot of Production first — this is your rollback point.
- Schedule a maintenance window if the change is disruptive.
- On the Production instance, run Copy Image From… → (Staging), then Update.
- Watch the instance return to Healthy, then run smoke tests.
- If something goes wrong:
- The instance fails to start on the new image → it moves to Errored; fix the change and Update again, or Recover. See Instance States.
- A data or behavioral regression → restore the pre-change Snapshot you took in step 1.
Applying This to Common Changes
| Change | How to promote |
|---|---|
| Custom App (new or updated) | Build and test in Development, then promote the image (Copy Image From…) through Staging to Production. |
| Pip dependencies / static files | Part of the image — same image-promotion flow. |
App configuration (PLUGINS_CONFIG) |
Part of the image and copied by Copy Image From…. |
| Jobs | Delivered from a Git repository, not baked into the image (see Adding Jobs). Promote by pointing each environment at the same repository and a specific branch, tag, or commit — advance Production to a reviewed release ref. |
| Nautobot version upgrade | Restore a Production Snapshot onto an instance running the current Production image, then move it to the new base Image — so database migrations run against Production data, in the order Production will. Validate App compatibility, then promote. See Upgrade Nautobot. |
| Environment-specific settings & Secrets | Not promoted — configure them once per environment. |
Automate with CI/CD
Everything you do in the Console is available through the Nautobot Cloud REST API, so teams can fold custom-App releases into their existing CI/CD pipelines. A typical release pipeline for an in-house App:
- Build and test the App in your own CI, and package it as a
.tar.gz. - Publish it — release to public PyPI, or upload the package to the Console via the API.
- Point the target instance at the new version — register the App version and add it to the instance's image via the API.
- Trigger the Update (rollout) on the instance via the API, then poll the instance until it returns to Healthy — fail the job if the build or startup fails.
- Promote — once the release passes in Development (and Staging), repeat against the next environment, gated behind your pipeline's tests and approvals.
Recommended practices for API-driven releases:
- Automate the lower environments; gate Production. Let CI push to Development on every merge, but require a manual approval or a green test suite before the pipeline promotes to Production.
- Use a dedicated service-account API token stored as a CI secret, and rotate it regularly.
- Poll for completion after triggering an Update, and fail the job if the instance doesn't reach Healthy — don't assume success.
- Promote the exact artifact you tested — pin App and dependency versions, or promote the built image with Copy Image From…, so Production runs precisely what passed in the lower environments.
- Snapshot Production before the Production step so a bad release can be rolled back.
Finding the endpoints
Explore the available endpoints and request/response shapes in the live API reference (linked from the API page). The Console UI calls these same endpoints, so anything you can do by hand you can script.
Best Practices
- Promote images, don't rebuild per environment. Copy Image From… guarantees Staging and Production run exactly what you tested.
- Promote one change at a time so a failure is easy to attribute and roll back.
- Rehearse in the right order: make the lower environment mirror Production (its image + restored Production data), then apply the change (Copy Image From…) — so migrations run against Production-like data exactly as they will in Production.
- Snapshot Production before every Production Update, and enable scheduled snapshots.
- Validate integrations in Staging, not Production — SSO, network reachability, external APIs.
- Keep Production credentials out of Development. Use a sanitized dataset in Development if Production data is sensitive.
- Enable Prevent Delete on Production and restrict its access appropriately.
A note on data after a restore
Restoring a Snapshot replaces the target's database — including user accounts — so after restoring Production data into a lower environment you sign in with the source instance's credentials. See Restore a Snapshot.