Slack Setup
These are the distinct configuration values you will need to configure in nautobot_config.py.
| Configuration Setting | Mandatory? | Default | Available on Admin Config |
|---|---|---|---|
enable_slack |
Yes | False | Yes |
slack_api_token |
Yes | -- | No |
slack_app_token |
Socket Mode | -- | No |
slack_signing_secret |
Yes | -- | No |
slack_slash_command_prefix |
No | "/" |
No |
slack_socket_static_host |
No | -- | No |
These values will be used in the nautobot_config.py file, once we get to the section where we cover server configuration.
For now, take a mental note that in this section where we are configuring the Slack application, we will need to explicitly note the
slack_api_token and slack_signing_secret values when they are presented.
Example config snippet from nautobot_config.py for configuring ChatOps with Slack:
# Enable installed apps. Add the name of each app to the list.
PLUGINS = ["nautobot_chatops"]

PLUGINS_CONFIG = {
    'nautobot_chatops': {
        'enable_slack': True,
        'slack_api_token': '<slack-api-token>',
        'slack_signing_secret': '<slack-signing-secret>',
    }
}
Info
Optional: Logos rely on Slack being able to access the Static URL provided by Nautobot. If you are running
Slack in Socket Mode, Nautobot ChatOps App will need you to specify where the static files are hosted.
This is helpful for giving Slack access to only the server hosting Nautobot Static Files. To configure the
static files host, use slack_socket_static_host ex. slack_socket_static_host: 'https://example.com/static/'.
Connecting to Slack
The Nautobot ChatOps app supports two methods of communicating with Slack.
- Incoming Webhooks
- Socket Mode
Added in version 1.10
Added socket mode support.
Webhooks vs. Socket Mode
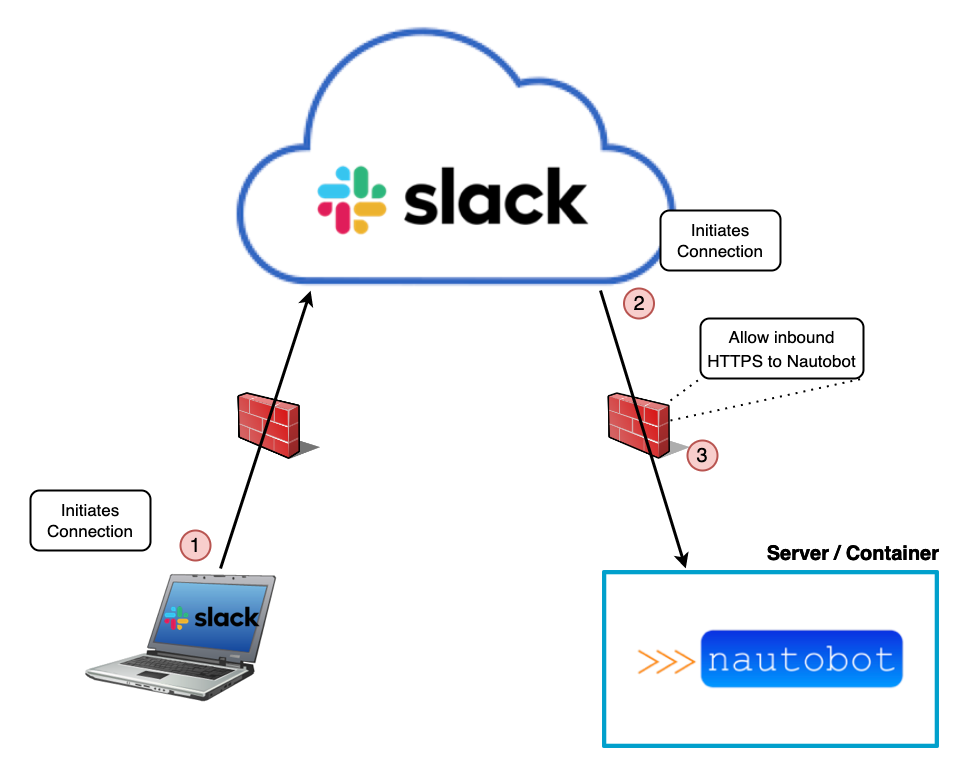
With incoming webhooks, whenever a user sends a message to the bot via the client application (phone or desktop app), (1) the connection is initiated from the client, and the message gets sent to Slack's cloud. The Slack servers then initiate a connection to the ChatOps app running on the Nautobot server (2). Since this is a new, incoming connection, it must be port forwarded and allowed through any firewalls in your network between the internet and your Nautobot server (3). Nautobot then replies to the existing connection to Slack, which in turn forwards the response to the client.
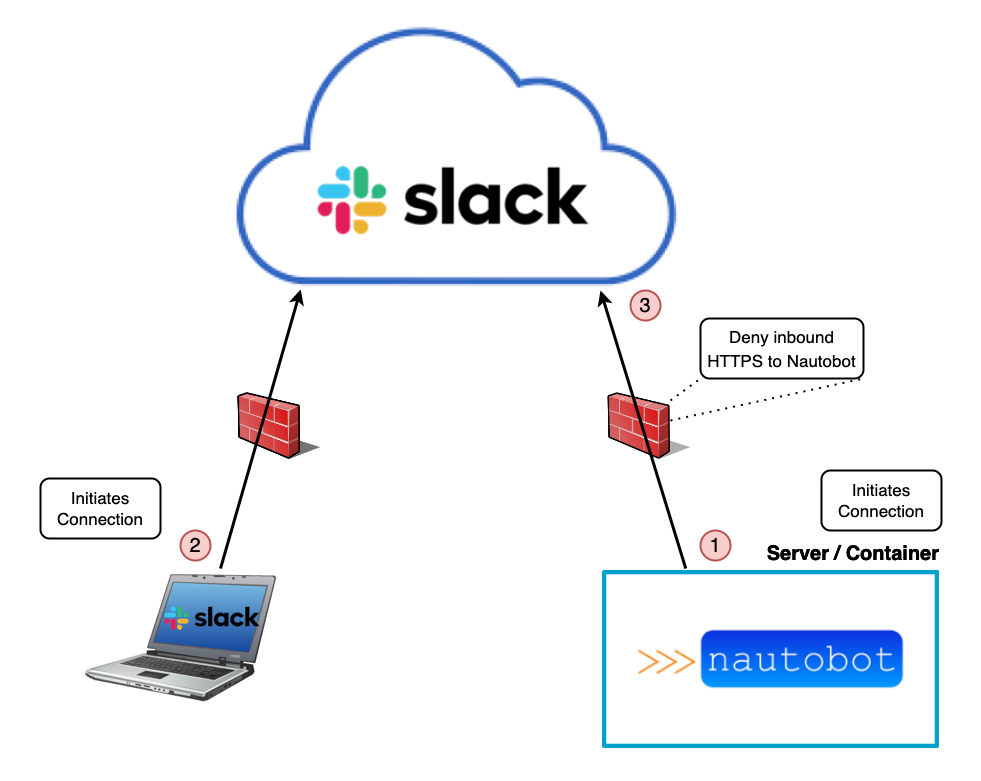
With socket mode, the Nautobot server will instead maintain a connection to the Slack cloud, initiating the connection from the Nautobot server itself (1). In this manner, externally facing firewalls do not need to allow inbound traffic from Slack to the Nautobot server. They only need to allow traffic outbound from the Nautobot server to Slack. Once a client sends a message to the bot (2), Slack forwards the message to Nautobot over the existing websocket connection (3). Nautobot then replies over the existing websocket connection to Slack, and Slack forwards the response to the client.
While there are sufficient ways of securing inbound API requests from the public internet (e.g. using a secure web API gateway), using socket mode is generally easier to set up from a network and netsec perspective, especially for companies that do not currently have a web API gateway installed, or are unfamiliar with them.
Create Slack App using a Manifest
Important - In step 3, you must configure the manifest differently depending on if you are using Socket mode or not.
- Log in to https://api.slack.com/apps and select "Create New App". Select "From an app manifest."
- Select your preferred Slack workspace for your app.
- In the window titled "Enter app manifest below," select the "YAML" formatting tab and copy/paste the contents of file nautobot_slack_manifest.yml from this repo. Update the below settings, then click Next.
- On line 5, you can change the name of the Chatbot here. By default it is set to
Nautobot - If using Socket mode:
- On line 34, update
socket_mode_enabledtotrue
- On line 34, update
- If not using Socket mode:
- On line 12, under setting
features/slash_commands/url, update<your-URL>with a publicly accessible URL to your Nautobot server. Note: The trailing/api/plugins/...are required. - Repeat this for line 30, under setting
settings/request_url/request_url - Repeat this for line 35, under setting
settings/interactivity/request_url - On line 34, verify
socket_mode_enabledis set tofalse
- On line 12, under setting
- On line 5, you can change the name of the Chatbot here. By default it is set to
- Review the summarized settings on the next window and click Create.
- On the General --> Basic Information page, note the
Signing Secretnear the bottom, under App Credentials. This will be needed later for settingSLACK_SIGNING_SECRET. - On this same Basic Information page, select
Install to Workspace. Select a channel to allow the app to post to (e.g. #general), and clickAllow.- If you are not a Slack admin, this step will require approval first from an Slack admin in your company.
- If using Socket mode:
- Under Settings --> Basic Information, scroll down to section "App-Level Tokens" and click
Generate Token and Scopesto generate an API token.- Token Name: This can be anything you want.
- Scopes: Click
Add Scopeand select the optionconnections:write.
- Click
Generate. Copy this API token. This will be needed later for settingSLACK_APP_TOKEN.
- Under Settings --> Basic Information, scroll down to section "App-Level Tokens" and click
- Under Settings --> Install App, copy the
Bot User OAuth Tokenhere. This will be needed later for settingSLACK_API_TOKEN. - Continue with below section "Post App-Creation Steps"
Optional: You can configure the App Icon on the General --> Basic Information page. Under
App Icon, select "Choose File." You can use the supplied icon nautobot_chatops_icon.png.
Post App-Creation Steps
Configuration Examples
Before continuing to the general install guide (linked below), you will need the token(s) and secret you previously generated.
In your nautobot_config.py file, the following PLUGINS and PLUGINS_CONFIG variables will need to look simlar to this:
PLUGINS = ["nautobot_chatops"]

PLUGINS_CONFIG = {
    "nautobot_chatops": {
        "enable_slack": True,
        "slack_api_token": "<slack-api-token>",
        "slack_app_token": "<slack-app-token>",
        "slack_signing_secret": "<slack-signing-secret>",
        "slack_slash_command_prefix": "/",
    }
}
The slack_app_token is only used if you are using Socket mode when setting up your chatbot. Otherwise it can be safely ignored.
You can also set these values as environment variables, and use the example listed below. Note the environment variables are all uppercase.
PLUGINS = ["nautobot_chatops"]

PLUGINS_CONFIG = {
    "nautobot_chatops": {
        "enable_slack": True,
        "slack_api_token": os.environ.get("SLACK_API_TOKEN"),
        "slack_app_token": os.environ.get("SLACK_APP_TOKEN"),
        "slack_signing_secret": os.environ.get("SLACK_SIGNING_SECRET"),
        "slack_slash_command_prefix": os.environ.get("SLACK_SLASH_COMMAND_PREFIX", "/"),
    }
}
Invite Chatbot to Channels
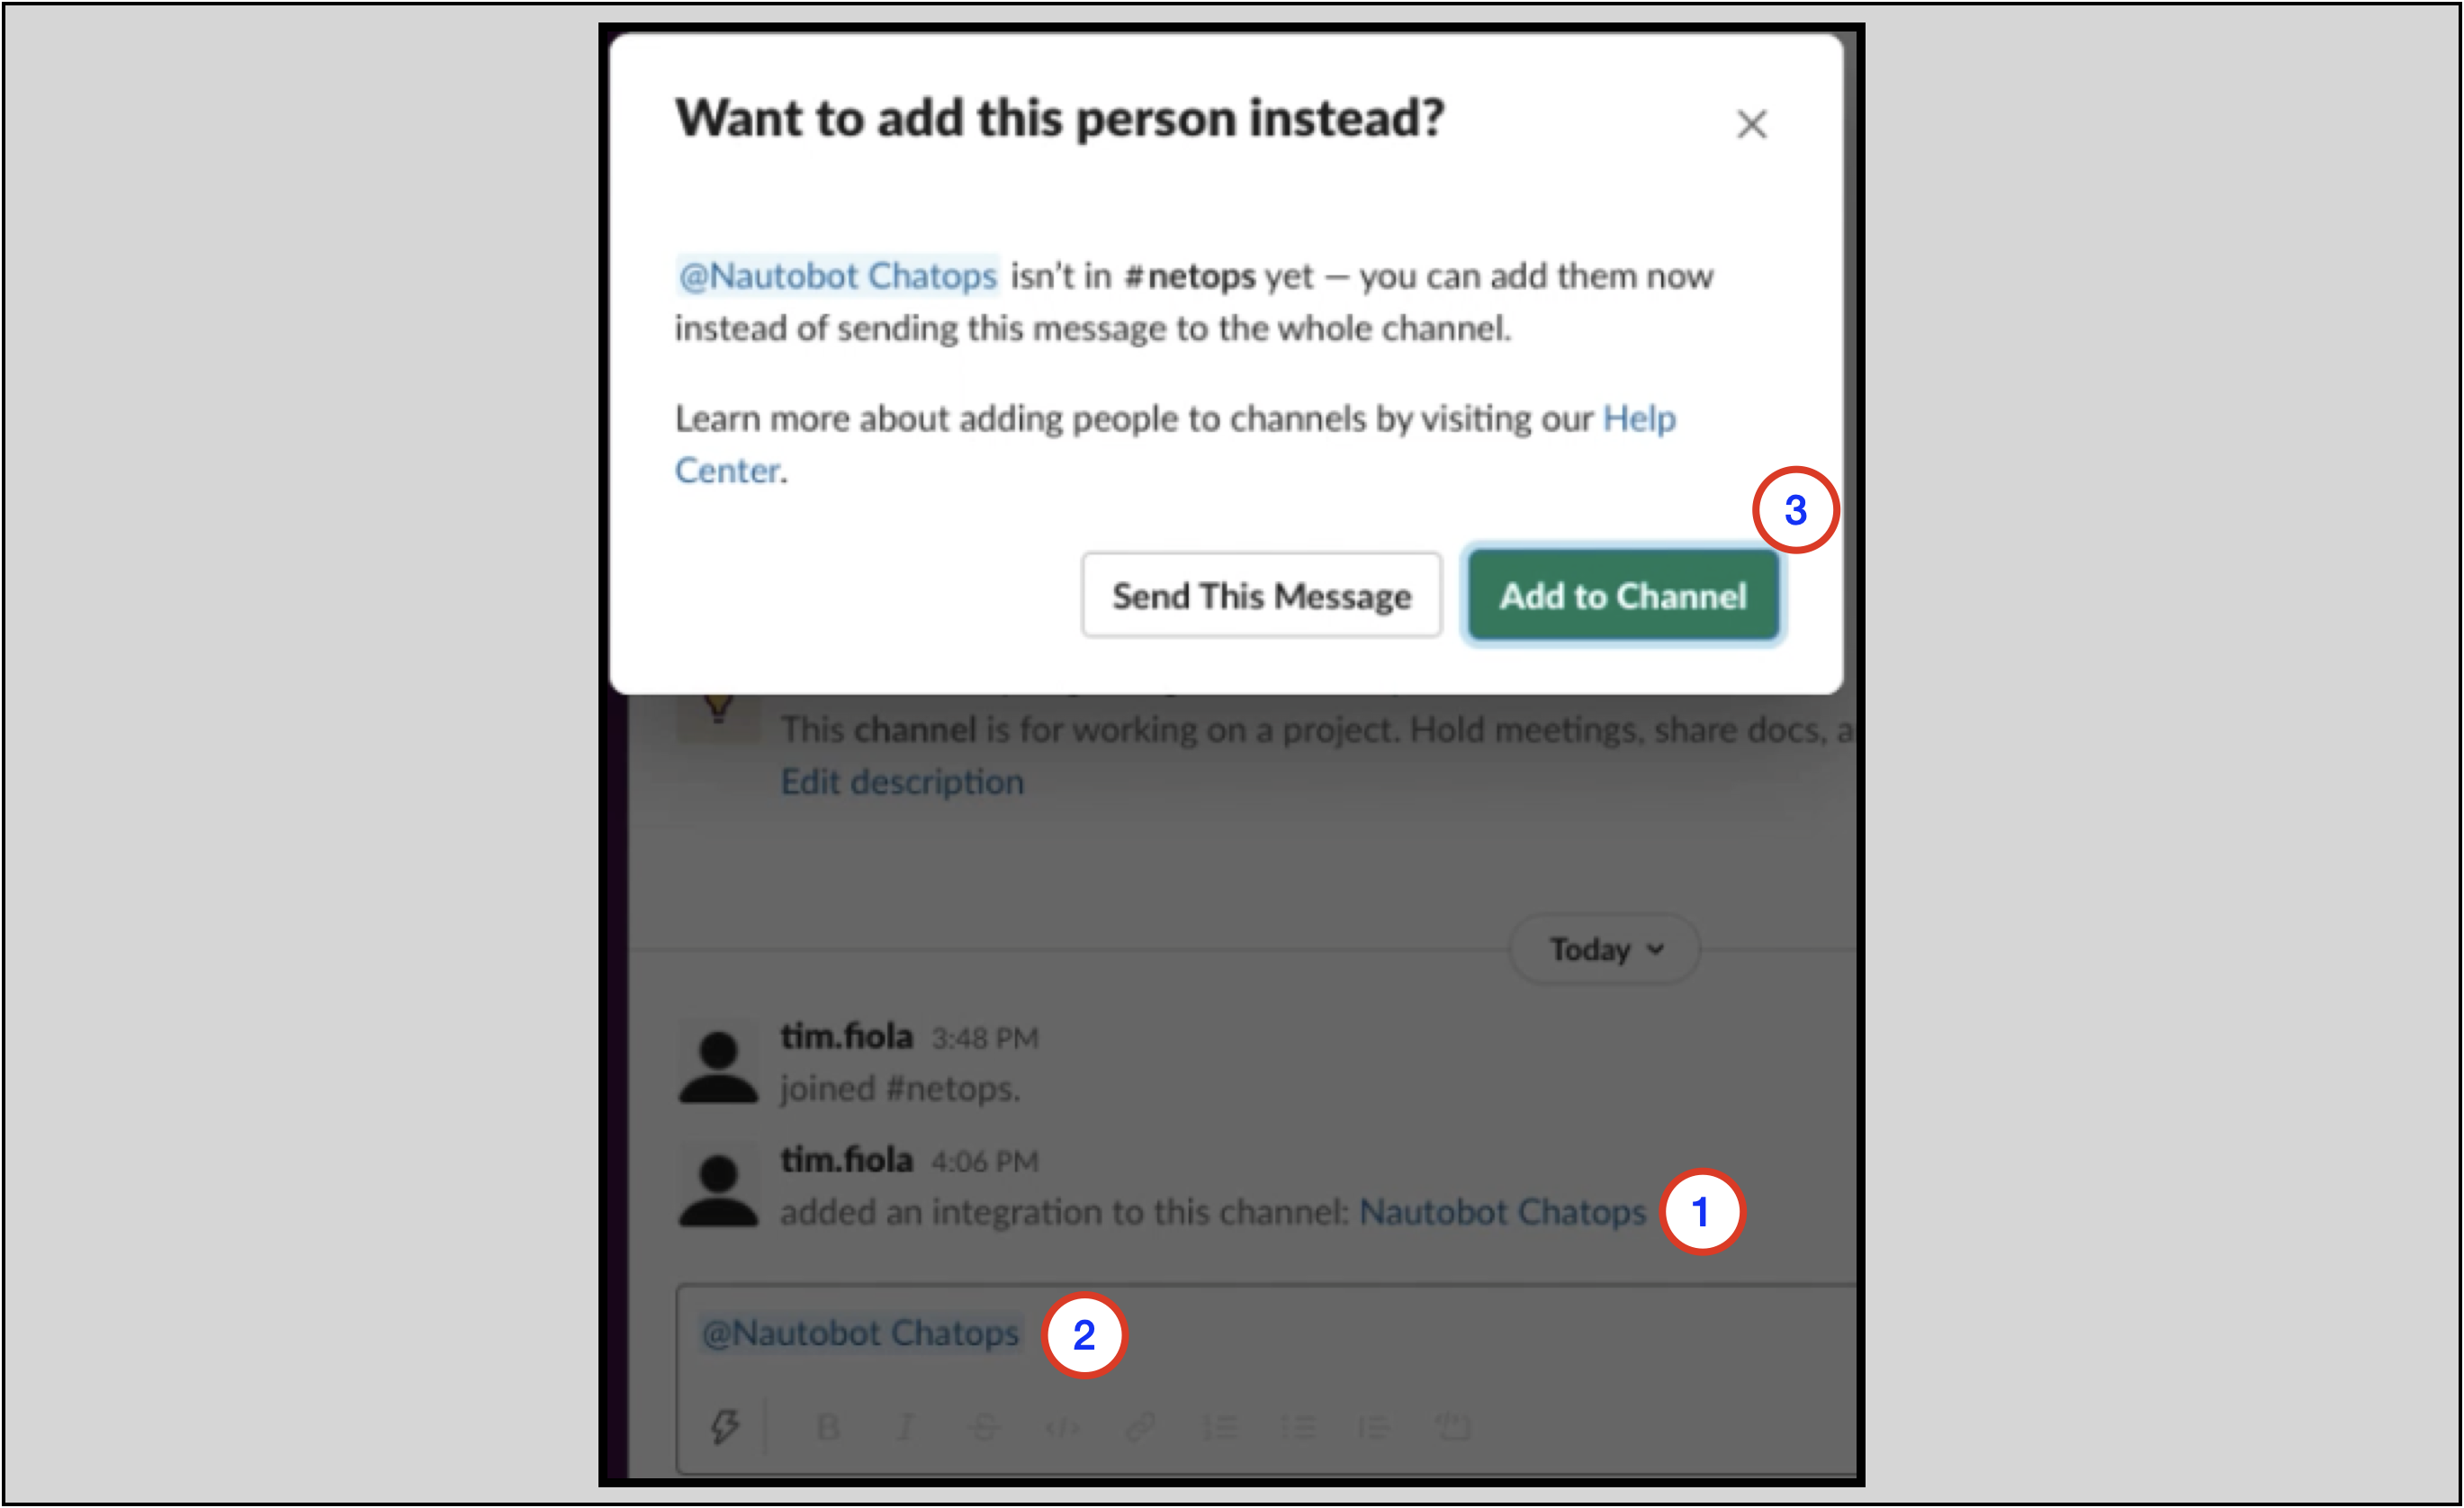
Note: In the Slack app, you will need to invite the chatbot to each channel that it will belong to with
@<app name>. For example, when an app namedNautobot ChatOpsis installed to the workspace:
- A message is displayed in the channel, saying that the integration
Nautobot ChatOpshas been added- You
@Nautobot ChatOpsin the channel- You are prompted to add
@Nautobot ChatOpsto the channel
Once these steps are completed, you can proceed to the Install Guide section.
Configuring Multiple Chatbots in a Workspace
Chatbots from multiple Nautobot implementations can exist in a single Slack workspace and even channel.
They will be differentiated in the workspace using the slack_slash_command_prefix value in PLUGINS_CONFIG.
Here is an example nautobot_config.py for the first Nautobot chatbot implementation in the workspace. This chatbot will be called in the workspace using /nautobot.
# Enable installed apps. Add the name of each app to the list.
PLUGINS = ["nautobot_chatops"]

PLUGINS_CONFIG = {
    "nautobot_chatops": {
        "enable_slack": True,
        "slack_api_token": "<slack-api-token>",
        "slack_signing_secret": "<slack-signing-secret>",
    }
}
Here is an example nautobot_config.py for a second Nautobot chatbot implementation in the workspace.
This configuration explicitly configures the slack_slash_command_prefix key/value.
This chatbot will be called in the workspace using /network2-nautobot.
# Enable installed apps. Add the name of each app to the list.
PLUGINS = ["nautobot_chatops"]

PLUGINS_CONFIG = {
    "nautobot_chatops": {
        "enable_slack": True,
        "slack_api_token": "<slack-api-token>",
        "slack_signing_secret": "<slack-signing-secret>",
        "slack_slash_command_prefix": "/network2-"
    }
}
NOTE: by default, your slash command must end with
nautobot. If noslack_slash_command_prefixis specified, the slash command will be/nautobot. If aslack_slash_command_prefixis specified, the slash command will be<slack_slash_command_prefix>nautobot.NOTE: Custom chatbot development allows for chatbot slash commands such as
/grafanaand/meraki.
General Chat Setup Instructions
See admin_install instructions here for general app setup instructions.
Startup Slack Sockets (Socket Mode)
Socket Mode requires it's own Worker in order poll Slack for new slash commands and interactions. Slack Socket Mode supports up to 10 active connections. To start a new connection there is a new Management Command provided.
start_slack_socket Management Command
nautobot-server start_slack_socket
Start a worker to connect to Slack.
Slack Socket Systemd Service
To establish the systemd unit file for the Slack Socket worker, copy and paste the following into /etc/systemd/system/nautobot-chatops-slack-socket.service:
[Unit]
Description=Nautobot Chatops Slack Socket Worker
Documentation=https://docs.nautobot.com/projects/chatops/en/latest/
After=nautobot.service
Wants=network-online.target

[Service]
Type=exec
Environment="NAUTOBOT_ROOT=/opt/nautobot"

User=nautobot
Group=nautobot
WorkingDirectory=/opt/nautobot

ExecStart=/opt/nautobot/bin/nautobot-server start_slack_socket

Restart=always
RestartSec=30
PrivateTmp=true

[Install]
WantedBy=multi-user.target
This can be done multiple times to create more workers. Up to 10 total workers can be created across all instances. Additional workers are useful to increase the amount of messages that can be processed from Slack. Additional workers are also useful for allowing ChatOps functionality during Server maintenance.
Configure systemd
Because we just added new service files, you'll need to reload the systemd daemon:
Then, start the nautobot-chatops-slack-socket services and enable it to initiate at boot time:
Deprected - Create Slack App without a Manifest (original method)
While this method is still possible, we recommend using the App Manifest method (described above) to install your Slack App.
- Log in to https://api.slack.com/apps and select "Create New App".
- Select "From scratch"
- Enter "Nautobot ChatOps" as the "App Name"
- Select your preferred Slack workspace for your app
- Click "Create App"
- On the "Basic Information" page for your app, under "Add features and functionality", select "Interactive Components"
- Set the toggle to "On"
- Enter the HTTPS URL of the Slack
interactionendpoint for your Nautobot installation - it should be something likehttps://<server>/api/plugins/chatops/slack/interaction/(note the trailing slash) - Select "Save Changes"
- On the "Basic Information" page for your app, under "Add features and functionality", select "Slash Commands"
- Decide now whether your setup requires a slack slash command prefix to disambiguate this bot's commands from those understood by other bots (such as if you have multiple older Nautobot ChatOps versions also enabled), such as
/nautobot-or/network2- - This part is a bit tedious, but for each supported command (e.g.
/nautobot,/grafana) you will need to:- Select "Create New Command"
- Enter the command text, the request URL (
https://<server>/api/plugins/chatops/slack/slash_command/in all cases), and the description and usage hints - Select "Save"
- It's up to you whether to configure only the top-level commands (
/nautobot, etc.) or whether you wish to configure all of the sub-commands as slash-commands as well (/nautobot-get-devices,/nautobot-get-facts, etc.). The sub-commands can always be entered as parameters to the top-level commands in any case (/nautobot get-devices) whether or not you also define them as first-class slash-commands in their own right. - TODO: we need a helper script that could be easily run to generate a full listing of subcommands so that a new deployer can know what all they need to set up!
- Decide now whether your setup requires a slack slash command prefix to disambiguate this bot's commands from those understood by other bots (such as if you have multiple older Nautobot ChatOps versions also enabled), such as
Note: if you want to interact with Nautobot to retrieve data without doing any custom code development, your slash command must be
/nautobotor end withnautobotfollowing the configured slack_slash_command_prefix. For example, the/network2-nautobotcommand would have aslack_slash_command_prefixof/network2-
- On the "Basic Information" page for your app, under "App Credentials", find the "Signing Secret" and click "Show". You will need to configure this value for the app as the
slack_signing_secretvalue, such as through an.envfile. If this value is not correctly configured, the bot will be unable to validate that inbound notifications it receives have been properly signed by the Slack server. - In the sidebar to the left, select "OAuth & Permissions".
- Under "Scopes", select "Add an OAuth Scope", and add the following scopes:
chat:writecommandschannels:readfiles:writeincoming-webhookusers:readusers:read.emailapp_mentions:readgroups:readim:readmpim:read
- At the top of this page, select "Install App to Workspace" and confirm it.
- There should now be a "Bot User OAuth Access Token" displayed, typically a string starting with
xoxb-. You will need to configure this value for the app as theslack_api_tokenvalue, either directly or through an.envfile. If this value is not properly configured, the bot will be unable to send content to the user.
- Under "Scopes", select "Add an OAuth Scope", and add the following scopes:
- Returning to the "Basic Information" page for your app, under "Display Information", you can specify the name, description, icon, and accent/background color for the app. You can use the
nautobot_logo.pngfrom this directory if desired. - Continue with below section "Post App-Creation Steps"